

A place for more technical discussions. Please make sure you post in the correct section on the site, this way it keeps the site tidy AND ensures you get a more relevant answer.
How to fit a 2"or 3 spring lift.+Wiring spotlights
Less
More
- Posts: 1356
- Thank you received: 210
12 Aug 2012 11:36 - 30 Jun 2014 21:01 #45978
by dirtydogz
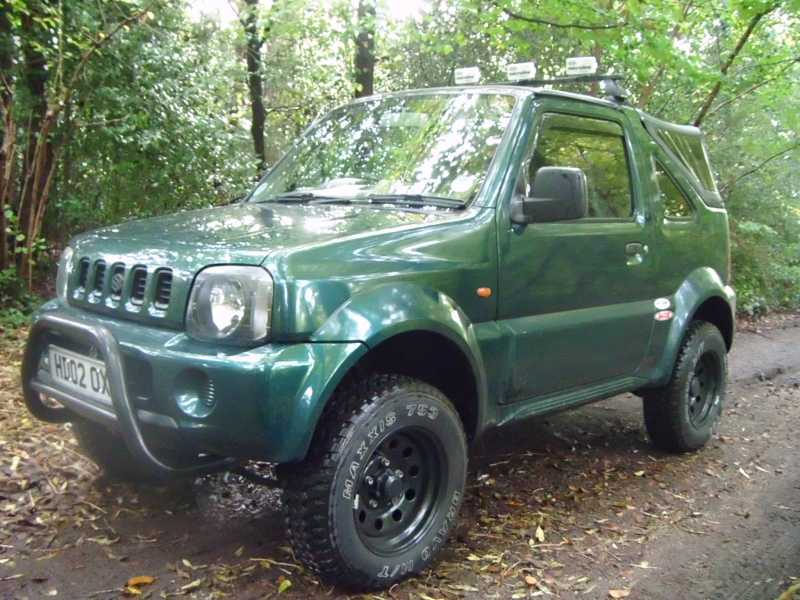
2002 JLX Soft Top")
Jimnybits 2" lift +Pro Comp ES1000 shocks.") Big Jimny rear shock mounts. Big Jimny adjustable panhard rods.
Big Jimny rear shock mounts. Big Jimny adjustable panhard rods.
Big Jimny steering damper bracket. Disco Armstrong steering damper. 7X15 black modulars. 205/75/15 Maxxis 743 bravo m/t.Superpro camber correction bushes.Black A bar....
How to fit a 2"or 3 spring lift.+Wiring spotlights was created by dirtydogz
Fitting a 2"(50mm)or 3"(75mm) lift. :woohoo:
If you got a set of longer brake hoses fit them first they are only needed on the 3"lift.")
You don't needed them on the 2" lift you will only need longer brake hoses if you remove the front anti roll bar.
You will also need to fit some rear shock brackets on the 2" and 3" lift, If you think you need them you can also fit a set of caster correction bushes this will help the steering self center + adjustable pan-hard rods this is up to you.
Next (WD40) all the nuts and bolts on the shocks for about 2 days before starting.
Start with the rear axle first,undo the wheel nuts a little,then jack up on the axle or the chassis on both sides and lower on to axle stands as close to the radius arms as possible , so the tyres are about 2"to 3" off the ground,now remove the wheels.
Next place the trolley jack in the middle of the rear axle, jack it up so you can remove the nuts+bolts from the old shocks.
The top bolts on the rear shocks might be seized on so take your time until the (WD40) has done it's job if they undo with no trouble go on to the next stage of the job, if not don't fit the lift springs with the old shocks, refit the old springs until you can remove the top bolts.
Next if every thing is ok and you have removed the top and bottom shock bolts, lower the axle down keeping an eye on the old brake pipe on the 2" lift,(don't over stretch it) that's if you haven't fitted the longer brake hoses, now remove the old rear springs.
If your fitting a set of the JIMNYBITS springs the two longer spring go on the front, one of the front springs is longer, and that one goes on the drivers side, the two short spring go on the back.
Next it's time to fit the new springs you might need some help from a mate to help you fit the lift springs back on, or as l did used a length of wood just to lever the axle down a little more to get the new springs back on, now jack the axle back up so the springs sit back in the axle saddles.
Now it's time to fit the stock brackets and shocks if you are using pro comp shocks you will need to cut the top bush rubbers and sleeves to fit in to the top shock mountings. just measure one of old top stock bushes.
Now do the front the same way as you did the back axle, you might need to cut the nuts off the top of the shocks if they are seized on, before you lower the axle it also helps to remove the front calipers + undo two bolts on the stabiliser link which hold the axle to the anti roll-bar this will give more room to get the new springs back on.
If you need the axles to drop a little more with the 3" lift you will need to remove one of the panhard rod bolts.
When your finished (CHECK) all the nuts +bolts+ wheel nuts are tight. :woohoo:
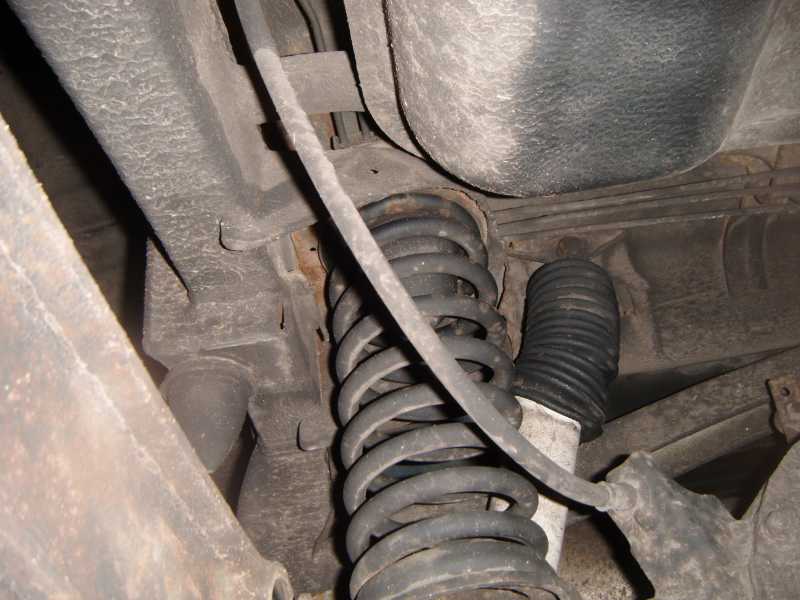
Photo of the standard rear brake line with the 2" lift.
Hope this helps.
DIRTYDOGZ
This is the way l fitted my 2" lift, so if you won't to add to this topic to help new members please do so .
stabiliser link.

caster correction bushes.

Big Jimny 3" lift.
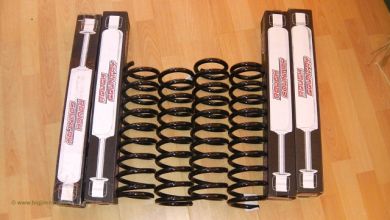
Jimnybits 2"lift

shock brackets

2"Jimnybits lift.
www.bigjimny.com/index.php/forum/8-my-ji...ydogz-jimny-soft-top
_________________________________________________________________________________
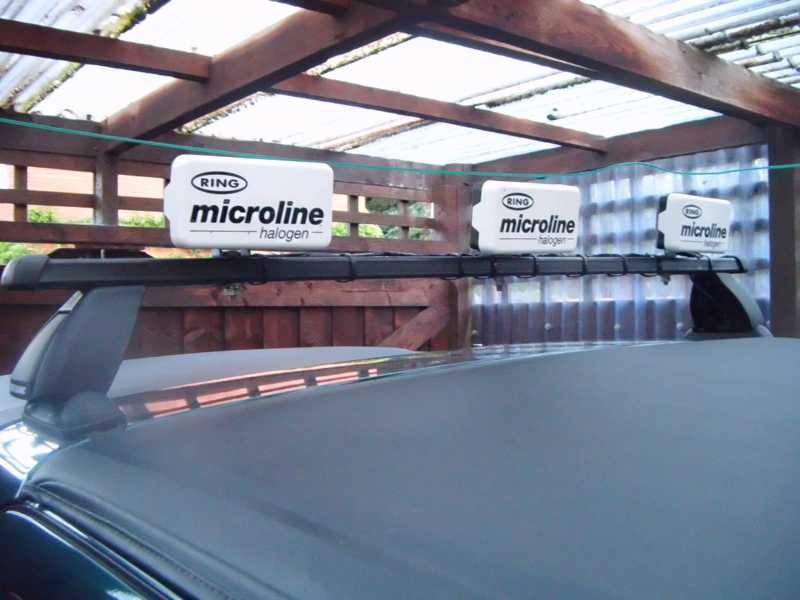
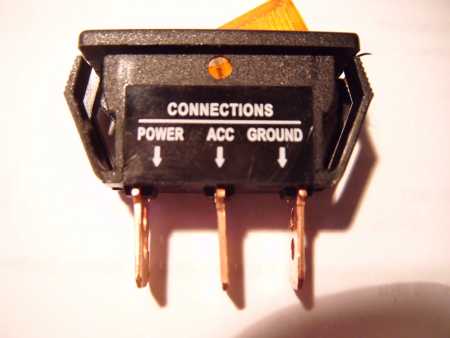
How to wire spotlights to work on the high beam.
Relay wiring diagram
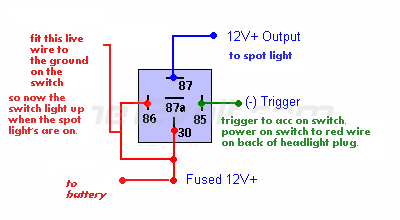
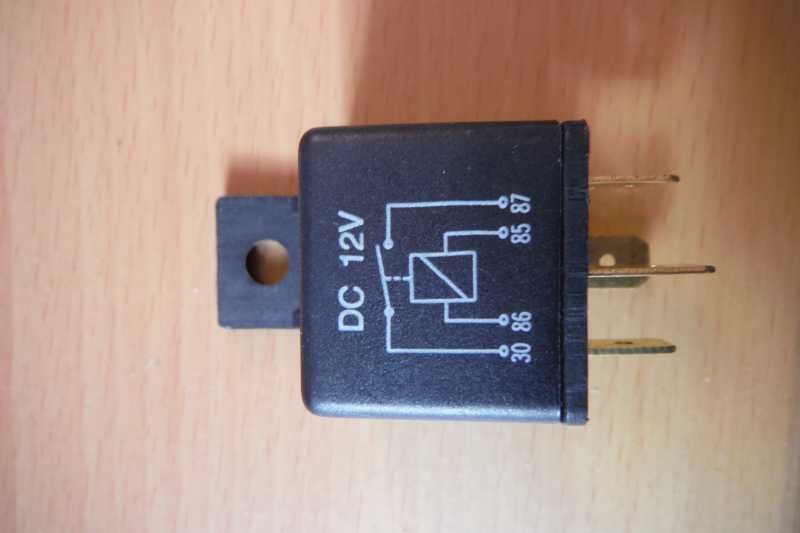
Wiring diagram was made with help from Renard 38.
Link to how to fit spolight on soft top www.bigjimny.com/index.php/forum?view=to...=8&id=10688&start=48
If you got a set of longer brake hoses fit them first they are only needed on the 3"lift.
You don't needed them on the 2" lift you will only need longer brake hoses if you remove the front anti roll bar.
You will also need to fit some rear shock brackets on the 2" and 3" lift, If you think you need them you can also fit a set of caster correction bushes this will help the steering self center + adjustable pan-hard rods this is up to you.
Next (WD40) all the nuts and bolts on the shocks for about 2 days before starting.
Start with the rear axle first,undo the wheel nuts a little,then jack up on the axle or the chassis on both sides and lower on to axle stands as close to the radius arms as possible , so the tyres are about 2"to 3" off the ground,now remove the wheels.
Next place the trolley jack in the middle of the rear axle, jack it up so you can remove the nuts+bolts from the old shocks.
The top bolts on the rear shocks might be seized on so take your time until the (WD40) has done it's job if they undo with no trouble go on to the next stage of the job, if not don't fit the lift springs with the old shocks, refit the old springs until you can remove the top bolts.
Next if every thing is ok and you have removed the top and bottom shock bolts, lower the axle down keeping an eye on the old brake pipe on the 2" lift,(don't over stretch it) that's if you haven't fitted the longer brake hoses, now remove the old rear springs.
If your fitting a set of the JIMNYBITS springs the two longer spring go on the front, one of the front springs is longer, and that one goes on the drivers side, the two short spring go on the back.
Next it's time to fit the new springs you might need some help from a mate to help you fit the lift springs back on, or as l did used a length of wood just to lever the axle down a little more to get the new springs back on, now jack the axle back up so the springs sit back in the axle saddles.
Now it's time to fit the stock brackets and shocks if you are using pro comp shocks you will need to cut the top bush rubbers and sleeves to fit in to the top shock mountings. just measure one of old top stock bushes.
Now do the front the same way as you did the back axle, you might need to cut the nuts off the top of the shocks if they are seized on, before you lower the axle it also helps to remove the front calipers + undo two bolts on the stabiliser link which hold the axle to the anti roll-bar this will give more room to get the new springs back on.
If you need the axles to drop a little more with the 3" lift you will need to remove one of the panhard rod bolts.
When your finished (CHECK) all the nuts +bolts+ wheel nuts are tight. :woohoo:
Photo of the standard rear brake line with the 2" lift.
Hope this helps.
DIRTYDOGZ
This is the way l fitted my 2" lift, so if you won't to add to this topic to help new members please do so .
stabiliser link.
caster correction bushes.
Big Jimny 3" lift.
Jimnybits 2"lift
shock brackets
2"Jimnybits lift.
www.bigjimny.com/index.php/forum/8-my-ji...ydogz-jimny-soft-top
_________________________________________________________________________________
How to wire spotlights to work on the high beam.
Relay wiring diagram
Wiring diagram was made with help from Renard 38.
Link to how to fit spolight on soft top www.bigjimny.com/index.php/forum?view=to...=8&id=10688&start=48
2002 JLX Soft Top
Jimnybits 2" lift +Pro Comp ES1000 shocks.
Big Jimny rear shock mounts. Big Jimny adjustable panhard rods.Big Jimny steering damper bracket. Disco Armstrong steering damper. 7X15 black modulars. 205/75/15 Maxxis 743 bravo m/t.Superpro camber correction bushes.Black A bar....
Last edit: 30 Jun 2014 21:01 by dirtydogz.
Please Log in or Create an account to join the conversation.
- Fearghal Murphy
- New Member
-

Public
Less
More
- Thank you received: 0
20 Aug 2012 21:48 #46515
by Fearghal Murphy
Replied by Fearghal Murphy on topic Re: Fitting a 2"or 3" spring lift.
Great thread this, i know i used Dogz info here to help me ! I SERIOUSLY concur with the use of relocation brackets, do not even try to get the job done without them, they make the job so much easier and satisfying ! Also gives your shocks and springs plenty of space ! If anyone is thinking of doing a suspension lift my advice would be..... DO IT ! My 3 inch lift has made such a difference "Big Blues" capabilities ! Mine even handles and drives better (wheel spacers also fitted) with the lift and the shocks are really top notch !
Gives the Jimny some extra presence too !
Gives the Jimny some extra presence too !
Please Log in or Create an account to join the conversation.
- Halkyn
- New Member
-
Public
Less
More
- Thank you received: 0
05 Sep 2012 20:48 #47594
by Halkyn
Replied by Halkyn on topic Fitting a 2"or 3" spring lift.
Great post Dogz! I've been looking for a comprehensive guide to this.
Couple of questions.
1) I have a jack, decent socket set, spring compressor. Do I need anything else, and how many spanners on the "Haynes Manual" difficultometer is this?
2)My truck is on the original suspension. 12 years old - I guess some of the bolts will be stuck fast?
3) How straight is the longer spring? The stock on mine seems to twist quite a bit from top to bottom.
4) Does the kit come with torque settings?
5) Will 2" kit require castor correction bushes?
Cheers, Halkyn
Please Log in or Create an account to join the conversation.
Less
More
- Posts: 1356
- Thank you received: 210
05 Sep 2012 22:40 - 30 Jun 2014 21:03 #47614
by dirtydogz
2002 JLX Soft Top
Jimnybits 2" lift +Pro Comp ES1000 shocks. Big Jimny rear shock mounts. Big Jimny adjustable panhard rods.
Big Jimny steering damper bracket. Disco Armstrong steering damper. 7X15 black modulars. 205/75/15 Maxxis 743 bravo m/t.Superpro camber correction bushes.Black A bar....
Replied by dirtydogz on topic Fitting a 2"or 3" spring lift.
Hi Halkyn.
1)You don't need spring compressors, you will need a set of combination spanners and some axle stands and can of WD40.
2)Haynes Manual 2to3 spanners if you have fit a lift before, if it's your first time 4 spanners.
3) Yes the top rear stock bolts might be seized so try to remove the rear shocks first.
4) No just hard hand tight.
5)It's best to fit correction bushes so the steering self centres.
hope this helps.
DIRTYDOGZ.
My Link www.bigjimny.com/index.php/forum?view=topic&catid=8&id=10688
2002 JLX Soft Top
Jimnybits 2" lift +Pro Comp ES1000 shocks.
Big Jimny rear shock mounts. Big Jimny adjustable panhard rods.Big Jimny steering damper bracket. Disco Armstrong steering damper. 7X15 black modulars. 205/75/15 Maxxis 743 bravo m/t.Superpro camber correction bushes.Black A bar....
Last edit: 30 Jun 2014 21:03 by dirtydogz.
Please Log in or Create an account to join the conversation.
- thorpee
- New Member
-
Public
Less
More
- Thank you received: 0
08 Oct 2012 04:24 #49713
by thorpee
Replied by thorpee on topic Fitting a 2"or 3" spring lift.+ Wiring spot lights
Just wondering how important the adjustable pan-hard rods are for the 2 inch lift? Only cause they are not in stock on the Big Jimny shop and quite expensive on Jimny Bits. I will be installing correction bushes though.
Please Log in or Create an account to join the conversation.
- Paul4x4
- New Member
-
Public
Less
More
- Thank you received: 0
08 Oct 2012 05:53 #49714
by Paul4x4
Replied by Paul4x4 on topic Fitting a 2"or 3" spring lift.+ Wiring spot lights
You won't need adjustable panhards. Axles might be slightly off center after the lift, but not very much. And there's panhard relocation brackets available, so those should take care of that problem if needed. Just install the lift kit, and see how you like it.thorpee wrote: Just wondering how important the adjustable pan-hard rods are for the 2 inch lift? Only cause they are not in stock on the Big Jimny shop and quite expensive on Jimny Bits. I will be installing correction bushes though.
Please Log in or Create an account to join the conversation.
Time to create page: 0.391 seconds