

Are you building a Mud Monster or a Pavement Princess??
If so you can have your own thread in this section.
This section on other websites has led to arguments and contention. People are posting pictures of their pride and joy and therefore CONSTRUCTIVE comments only please!
If so you can have your own thread in this section.
This section on other websites has led to arguments and contention. People are posting pictures of their pride and joy and therefore CONSTRUCTIVE comments only please!
Another green laner build
- Dirtbird
- New Member
-

Public
Less
More
- Thank you received: 0
10 Oct 2021 16:05 #239279
by Dirtbird
Replied by Dirtbird on topic Another green laner build
Les Im interested .Have you got a plan / neat idea for where to carry the hilift jack on the jimny?
Please Log in or Create an account to join the conversation.
10 Oct 2021 18:03 #239281
by LesNewell
Replied by LesNewell on topic Another green laner build
I'm not sure about the hilift. I'm not a fan of carrying them outside on the door. I have removed the rear seats so I have a reasonable amount of room in the back. I'm looking for a light weight shorter hilift. The Jimny doesn't need the strength or lift height of a standard hilift. If I can't find one I'll probably shorten a normal hilift. It should then be possible to mount it upright in the back.
I did some testing on the receiver locking mechanism. With a 6mm locking plate it fails at about 7 tonnes. This is a test using an 8mm locking plate. Interestingly it only went to about 7.5 tonnes. Either way, it's no going to break in this application.
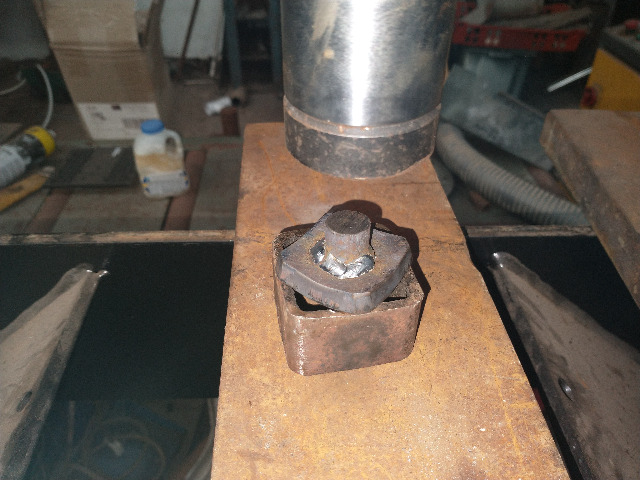
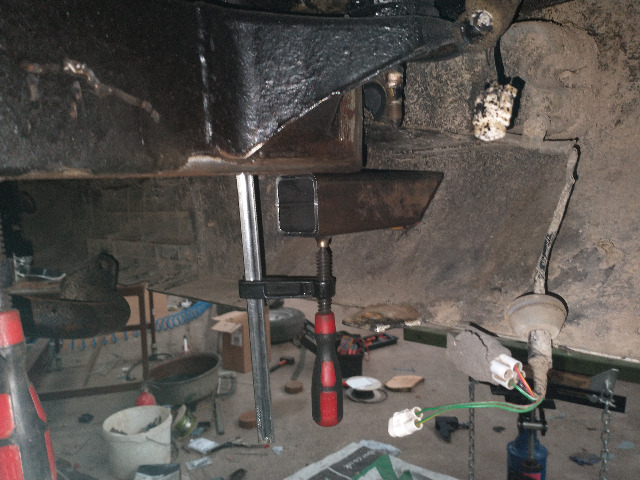
I had hoped to use 40x40, 4mm wall box section for the receivers with 30x30 inserts. However after some testing I found the inserts are plenty strong enough for towing but due to the overhang, when jacking they fail at about ~750kg. It's probably enough but it's a but too close for my liking. I ended up stepping up a size with 50x50 4mm wall receivers and 40x40 inserts. That will be plenty strong.
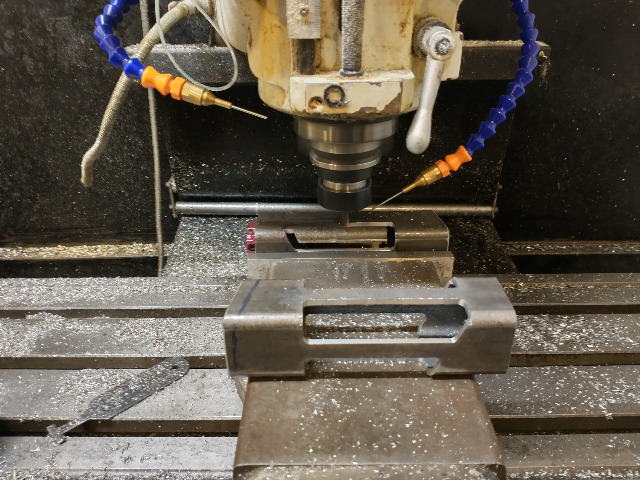
The front chassis legs have crumple zones. If I just weld a chunk of 2" thick wall box on top it's going to mess with the crumple zones. After thinking about it, I machined off a lot of the box section. Here's one done and one being CNC machined.
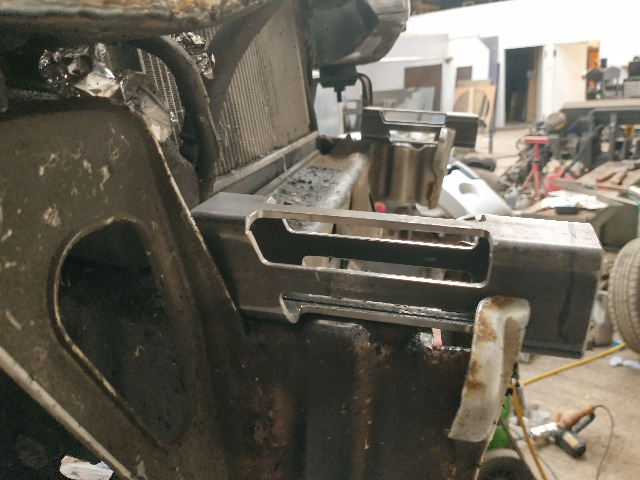
With the box section in place the gaps bridge the crumple zones.
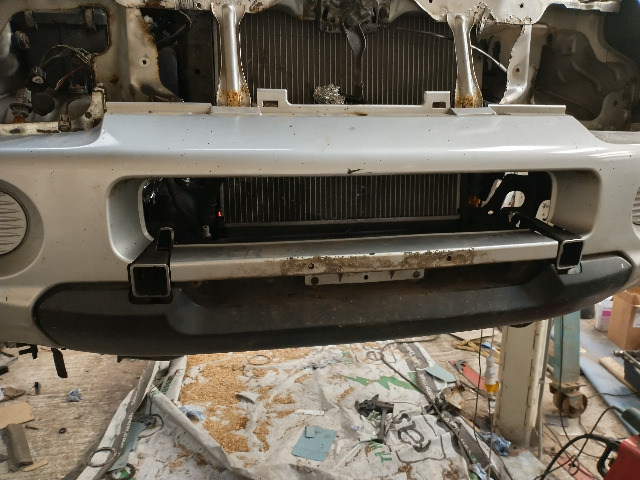
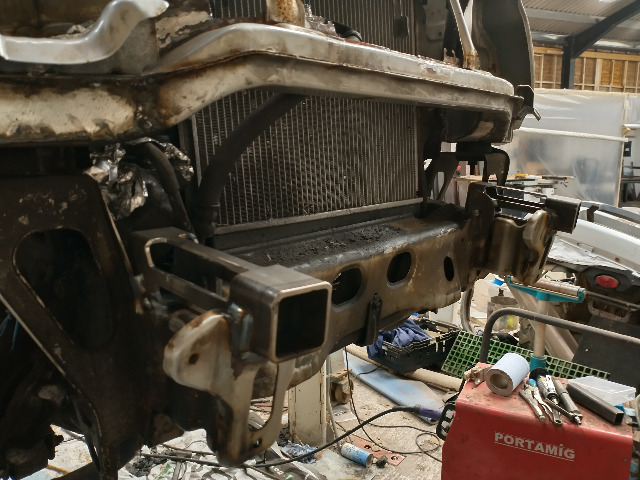
The front bumper is cut away for the receivers. This amount of material removal has weakened the bumper quite a lot. I think I'll have to make some extra bumper mounts to add support. Once the receivers are painted body colour they shouldn't be too glaringly obvious.
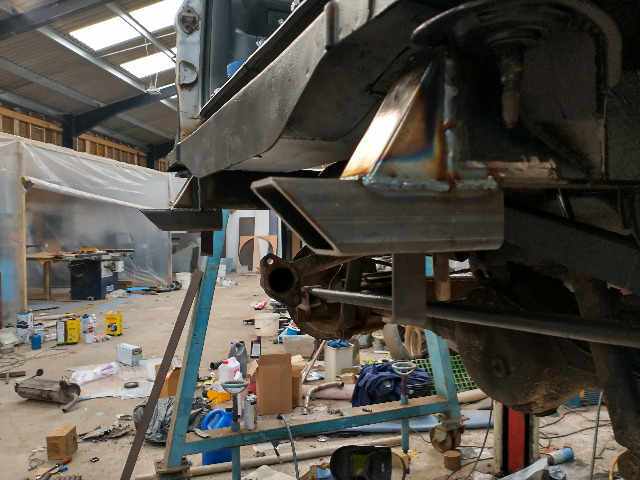
The rear ones a a bit less obtrusive.
From the other side. There will be triangular braces extending the rear of the chassis down to the receiver to add strength.
I did some testing on the receiver locking mechanism. With a 6mm locking plate it fails at about 7 tonnes. This is a test using an 8mm locking plate. Interestingly it only went to about 7.5 tonnes. Either way, it's no going to break in this application.
I had hoped to use 40x40, 4mm wall box section for the receivers with 30x30 inserts. However after some testing I found the inserts are plenty strong enough for towing but due to the overhang, when jacking they fail at about ~750kg. It's probably enough but it's a but too close for my liking. I ended up stepping up a size with 50x50 4mm wall receivers and 40x40 inserts. That will be plenty strong.
The front chassis legs have crumple zones. If I just weld a chunk of 2" thick wall box on top it's going to mess with the crumple zones. After thinking about it, I machined off a lot of the box section. Here's one done and one being CNC machined.
With the box section in place the gaps bridge the crumple zones.
The front bumper is cut away for the receivers. This amount of material removal has weakened the bumper quite a lot. I think I'll have to make some extra bumper mounts to add support. Once the receivers are painted body colour they shouldn't be too glaringly obvious.
The rear ones a a bit less obtrusive.
From the other side. There will be triangular braces extending the rear of the chassis down to the receiver to add strength.
The following user(s) said Thank You: Soeley
Please Log in or Create an account to join the conversation.
- Dirtbird
- New Member
-
Public
Less
More
- Thank you received: 0
10 Oct 2021 23:47 #239287
by Dirtbird
Replied by Dirtbird on topic Another green laner build
Les, you are out there man, in the creative flow it is a form of mechanical art man. Really enjoy and envy your ability and creative imagination, it's making me think beyond the reassembly that I do.
Please Log in or Create an account to join the conversation.
11 Oct 2021 20:05 #239326
by LesNewell
Replied by LesNewell on topic Another green laner build
Thanks. I've involved in manufacturing and software most of my life so I've had a bit of practice in solving problems and making things work.
Please Log in or Create an account to join the conversation.
16 Oct 2021 20:23 - 16 Oct 2021 20:24 #239457
by LesNewell
Replied by LesNewell on topic Another green laner build
More progress. Rear receivers installed. They aren't going to break!
Fronts welded in place.
An expensive present. I'm still waiting for the locking diffs to turn up. These two purchases pretty much equal what I paid for the Jimny.
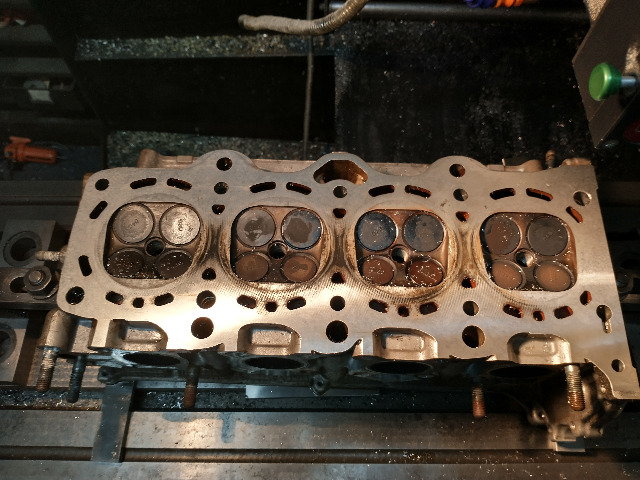
With the welding about done, time to deal with the head gasket. After removing the head I checked it for straightness and it was pretty good with a tiny bit of twist. Clamping it to the milling machine was enough to pull out the twist. It looks like I found the problem. The head has sunk between the cylinders, probably due to overheating. This is after the first cut. You can see how the edges have cut but the middle is untouched. It took about 0.08mm total to clean up, which is a heck of lot less than I needed to take off the Copelander's head. I'll grind the valves and reinstall it tomorrow.
Fronts welded in place.
An expensive present. I'm still waiting for the locking diffs to turn up. These two purchases pretty much equal what I paid for the Jimny.
With the welding about done, time to deal with the head gasket. After removing the head I checked it for straightness and it was pretty good with a tiny bit of twist. Clamping it to the milling machine was enough to pull out the twist. It looks like I found the problem. The head has sunk between the cylinders, probably due to overheating. This is after the first cut. You can see how the edges have cut but the middle is untouched. It took about 0.08mm total to clean up, which is a heck of lot less than I needed to take off the Copelander's head. I'll grind the valves and reinstall it tomorrow.
Last edit: 16 Oct 2021 20:24 by LesNewell.
Please Log in or Create an account to join the conversation.
17 Oct 2021 19:20 #239484
by LesNewell
Replied by LesNewell on topic Another green laner build
Ho hum, less progress than I hoped today. I ground and reinstalled the valves then made the mistake of checking the valve clearances. All are bigger than spec. Even the biggest shims Suzuki supply won't be enough. On closer examination all of the buckets are worn where they contact the valve heads. My options are:
- Buy new buckets and shims. Likely to be pretty expensive + possible availability issues.
- Buy the biggest shims Suzuki supply. The clearances will be up to 0.05mm out of tolerance.
- I believe some Toyotas use the same diameter shims so maybe try to locate some bigger Toyota shims.
- Say F it and just reassemble as-is. The engine ran fine before. The clearances are up to 0.1mm out of spec. I can't see that making a lot of difference to power. It will affect valve train life slightly but this car isn't going to do major mileage. I bet most of these engines with decent mileage have the same issue.
Please Log in or Create an account to join the conversation.
Time to create page: 0.485 seconds