Difference between revisions of "Tie rod end replacement"
Jump to navigation
Jump to search
m (Bosanek moved page Tie Rod End Replacement to Tie rod end replacement without leaving a redirect: Capital letter correction) |
m (Added the article into gen2 and gen4 categories) |
||
| (3 intermediate revisions by the same user not shown) | |||
| Line 5: | Line 5: | ||
| − | Yet another source of poor steering on a Jimny is a worn | + | Yet another source of poor steering on a Jimny is a worn tie rod / track rod end. |
These are a simple job to change, although you should then get the alignment checked/set afterwards. | These are a simple job to change, although you should then get the alignment checked/set afterwards. | ||
| Line 12: | Line 12: | ||
== Diagnostics == | == Diagnostics == | ||
| + | |||
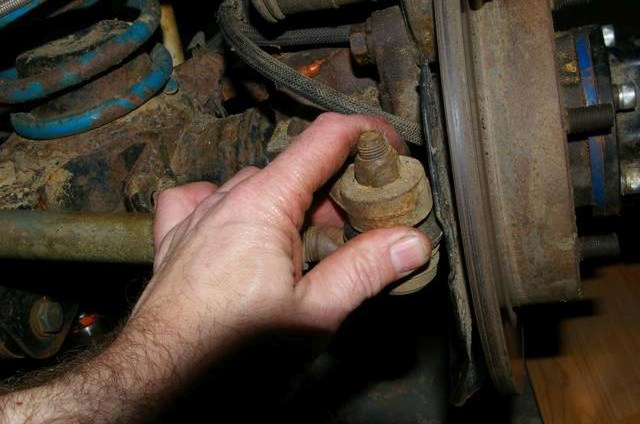
| + | [[File:Tie rod end replacement guide - figure 01.jpg|thumb|left|640px|Figure 01 - checking a tie rod end]] | ||
* First, find out which one is worn. | * First, find out which one is worn. | ||
* Jack up the vehicle on the side you want to check and make sure the vehicle is secured. | * Jack up the vehicle on the side you want to check and make sure the vehicle is secured. | ||
| − | * Place your hand carefully and lightly over the joint and with a firm grip on the steering rod | + | * Place your hand carefully and lightly over the joint and with a firm grip on the steering rod. |
| − | * If you can feel a shift or mechanical click/movement in the joint then it is worn. | + | * Try and shake the steering rod around in all directions. |
| + | * If you can feel a shift or mechanical click/movement in the joint, then it is worn. | ||
| + | <br clear=all> | ||
| − | + | == Removal == | |
| − | |||
| − | == | + | === Step 1 === |
| − | |||
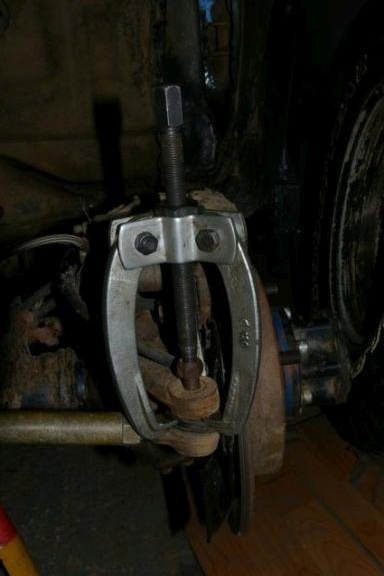
| − | + | [[File:Tie rod end replacement guide - figure 02.jpg|thumb|left|384px|Figure 02 - splitting the joint]] | |
| − | + | * Once you have confirmed that there is a problem, the task of stripping is actually quite easy. | |
| + | * First remove the wheel, it gives you more room. | ||
| + | * Now use a splitter to break the joint open. | ||
| + | * Here I am using a puller. | ||
| + | * I have undone the tie rod end nut but NOT removed it fully. | ||
| + | * I have put the end of the puller inside the “dish” created by the loose nut on the end of the joint. | ||
| + | * I then put the puller feet into the gap between the rubber and the control arm that the joint attaches to. | ||
| + | <br clear=all> | ||
| − | + | === Step 2 === | |
| − | |||
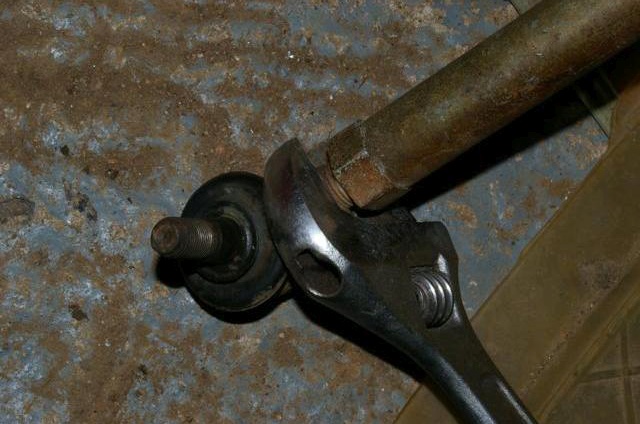
| − | + | [[File:Tie rod end replacement guide - figure 03.jpg|thumb|left|640px|Figure 03 - removing a tie rod end]] | |
| + | * The joint should then split with a bang. | ||
| + | * Now you have to remove the joint. | ||
| + | * The trick here is to unscrew the joint without disturbing the locking nut position. | ||
| + | * The locking nut position is what sets the alignment of the steering. | ||
| + | * It is best to try and not disturb it too much so that the alignment is not too far out. | ||
| + | * The joints can rust in and can be very difficult to undo. | ||
| + | * However, I was lucky and it was possible to wind the joint off the rod without touching the locking nut. | ||
| + | * Note that in the picture the locking nut appears to be part of the tracking rod itself as it is corroded on. | ||
| + | * The nut is in fact separate and may need undoing half a turn to allow the joint to be unwound. | ||
| + | <br clear=all> | ||
| − | |||
| − | |||
| + | === Step 3 === | ||
| − | |||
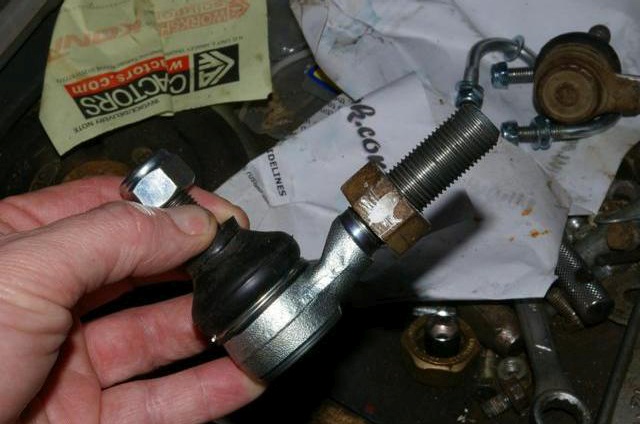
| + | [[File:Tie rod end replacement guide - figure 04.jpg|thumb|left|640px|Figure 04 - marking the nut]] | ||
| − | + | * With the tie rod removed, put a mark on the locking nut and then remove the nut, counting the whole turns it takes to come off. | |
| − | + | <br clear=all> | |
| Line 53: | Line 70: | ||
| − | + | === Step 1 === | |
| − | [[ | + | [[File:Tie rod end replacement guide - figure 05.jpg|thumb|left|640px|Figure 05 - nut wound onto new joint]] |
| − | Figure | ||
| + | * Now count the same number of turns as you wind the nut onto the new joint. | ||
| + | <br clear=all> | ||
| − | |||
| + | === Step 2 === | ||
| − | [[ | + | [[File:Tie rod end replacement guide - figure 06.jpg|thumb|left|640px|Figure 06 - tightening the joint]] |
| − | |||
| + | * Wind the whole joint onto the rod and re-assemble. | ||
| + | * You will probably find that when tightening the top nut on the joint, the whole assembly simply turns. | ||
| + | * You need to put some pressure on the joint to stop it rotating whilst you are tightening it. | ||
| + | * Here I have placed a jack underneath the joint and jacked up the joint slightly. | ||
| + | <br clear=all> | ||
| − | + | ||
| + | === Step 3 === | ||
| + | |||
| + | |||
| + | Now tighten up the locking nut, replace the wheel and you are finished. | ||
| + | |||
| + | |||
| + | == Aftermath == | ||
| + | |||
| + | |||
| + | You should get the alignment checked and adjusted in a professional work station as soon as you can. | ||
{{Edited}} | {{Edited}} | ||
| − | [[Category:Steering]] | + | |
| − | [[Category:Howto]] | + | [[Category:Steering - gen2]] |
| + | [[Category:Howto - gen2]] | ||
| + | |||
| + | [[Category:Steering - gen3]] | ||
| + | [[Category:Howto - gen3]] | ||
| + | |||
| + | [[Category:Steering - gen4]] | ||
| + | [[Category:Howto - gen4]] | ||
Latest revision as of 13:32, 17 January 2021
![]() The content of any article might be expanded / improved in the future - revisit it sometimes.
The content of any article might be expanded / improved in the future - revisit it sometimes.
![]() Seen a mistake? Know something that isn't written? Edit and change this article yourself!
Seen a mistake? Know something that isn't written? Edit and change this article yourself!
![]() Some images in the article (if present) can be enlarged by clicking on them.
Some images in the article (if present) can be enlarged by clicking on them.
Contents
Introduction
Yet another source of poor steering on a Jimny is a worn tie rod / track rod end.
These are a simple job to change, although you should then get the alignment checked/set afterwards.
Diagnostics
- First, find out which one is worn.
- Jack up the vehicle on the side you want to check and make sure the vehicle is secured.
- Place your hand carefully and lightly over the joint and with a firm grip on the steering rod.
- Try and shake the steering rod around in all directions.
- If you can feel a shift or mechanical click/movement in the joint, then it is worn.
Removal
Step 1
- Once you have confirmed that there is a problem, the task of stripping is actually quite easy.
- First remove the wheel, it gives you more room.
- Now use a splitter to break the joint open.
- Here I am using a puller.
- I have undone the tie rod end nut but NOT removed it fully.
- I have put the end of the puller inside the “dish” created by the loose nut on the end of the joint.
- I then put the puller feet into the gap between the rubber and the control arm that the joint attaches to.
Step 2
- The joint should then split with a bang.
- Now you have to remove the joint.
- The trick here is to unscrew the joint without disturbing the locking nut position.
- The locking nut position is what sets the alignment of the steering.
- It is best to try and not disturb it too much so that the alignment is not too far out.
- The joints can rust in and can be very difficult to undo.
- However, I was lucky and it was possible to wind the joint off the rod without touching the locking nut.
- Note that in the picture the locking nut appears to be part of the tracking rod itself as it is corroded on.
- The nut is in fact separate and may need undoing half a turn to allow the joint to be unwound.
Step 3
- With the tie rod removed, put a mark on the locking nut and then remove the nut, counting the whole turns it takes to come off.
Installation
Step 1
- Now count the same number of turns as you wind the nut onto the new joint.
Step 2
- Wind the whole joint onto the rod and re-assemble.
- You will probably find that when tightening the top nut on the joint, the whole assembly simply turns.
- You need to put some pressure on the joint to stop it rotating whilst you are tightening it.
- Here I have placed a jack underneath the joint and jacked up the joint slightly.
Step 3
Now tighten up the locking nut, replace the wheel and you are finished.
Aftermath
You should get the alignment checked and adjusted in a professional work station as soon as you can.
Page last edited on 17/01/2021 by user Bosanek


