Difference between revisions of "Front brake pad change"
Jump to navigation
Jump to search

m (Bosanek moved page Front Brake Pad change to Front brake pad change without leaving a redirect: Capital letter correction) |
RobNoxious (talk | contribs) m (Added a small note to pay attention to brake fluid reservoir whilst compressing the caliper piston as not to cause an overflow in the engine bay.) Tag: visualeditor |
||
| Line 20: | Line 20: | ||
{{tools|<ul><li> Standard metric sockets and spanners</li><li>Assorted screwdrivers</li><li>Circlip pliers (External)</li><li>A G-Clamp or piston retraction tool</li></ul>}} | {{tools|<ul><li> Standard metric sockets and spanners</li><li>Assorted screwdrivers</li><li>Circlip pliers (External)</li><li>A G-Clamp or piston retraction tool</li></ul>}} | ||
| − | <br clear=all> | + | <br clear="all"> |
| Line 31: | Line 31: | ||
* Release the wheel nuts and jack up the car and remove the road wheel. | * Release the wheel nuts and jack up the car and remove the road wheel. | ||
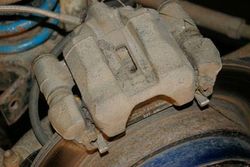
* This then reveals the [[Wikipedia:brake caliper | brake caliper]], this is the passenger side (nearside) caliper (UK) . | * This then reveals the [[Wikipedia:brake caliper | brake caliper]], this is the passenger side (nearside) caliper (UK) . | ||
| − | <br clear=all> | + | <br clear="all"> |
[[File:Unbolt_caliper.jpg|thumb|left|250px|Unbolting the caliper]] | [[File:Unbolt_caliper.jpg|thumb|left|250px|Unbolting the caliper]] | ||
| Line 37: | Line 37: | ||
* Using a 12mm spanner, release the front caliper bolt (the left is the front of the car in this picture). | * Using a 12mm spanner, release the front caliper bolt (the left is the front of the car in this picture). | ||
* Then loosen the same bolt on the rear of the caliper. | * Then loosen the same bolt on the rear of the caliper. | ||
| − | <br clear=all> | + | <br clear="all"> |
[[File:Open_caliper.jpg|thumb|left|250x250px|Open brake caliper]] | [[File:Open_caliper.jpg|thumb|left|250x250px|Open brake caliper]] | ||
* The caliper then opens up using the rear bolt as a hinge. | * The caliper then opens up using the rear bolt as a hinge. | ||
| − | <br clear=all> | + | <br clear="all"> |
[[File:Removing_pads.jpg|thumb|left|250x250px|Removing the brake pads]] | [[File:Removing_pads.jpg|thumb|left|250x250px|Removing the brake pads]] | ||
| Line 50: | Line 50: | ||
* If the pads resist, gently prise out the pads with a small screwdriver - do not remove the spring clips). | * If the pads resist, gently prise out the pads with a small screwdriver - do not remove the spring clips). | ||
* If you require new [https://www.bigjimny.com/store/front-brake-pads-aisin-suzuki-jimny.html pads], [https://www.bigjimny.com/store/front-pad-fitting-kit.html spring clips] or a [https://www.bigjimny.com/store/caliper-fitting-kit-aisin-suzuki-jimny.html caliper fitting kit] then these are available in the [https://www.bigjimny.com/store/ BigJimny Store]. | * If you require new [https://www.bigjimny.com/store/front-brake-pads-aisin-suzuki-jimny.html pads], [https://www.bigjimny.com/store/front-pad-fitting-kit.html spring clips] or a [https://www.bigjimny.com/store/caliper-fitting-kit-aisin-suzuki-jimny.html caliper fitting kit] then these are available in the [https://www.bigjimny.com/store/ BigJimny Store]. | ||
| − | <br clear=all> | + | <br clear="all"> |
[[File:pads.jpg|thumb|left|250x250px|The new pads]] | [[File:pads.jpg|thumb|left|250x250px|The new pads]] | ||
| Line 58: | Line 58: | ||
* New [https://www.bigjimny.com/store/front-brake-pads-aisin-suzuki-jimny.html pads], are available in the BigJimny Store. | * New [https://www.bigjimny.com/store/front-brake-pads-aisin-suzuki-jimny.html pads], are available in the BigJimny Store. | ||
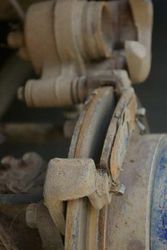
* The old are worn down to the metal. | * The old are worn down to the metal. | ||
| − | <br clear=all> | + | <br clear="all"> |
[[File:Oldpads.jpg|thumb|left|250x250px|OOPS!]] | [[File:Oldpads.jpg|thumb|left|250x250px|OOPS!]] | ||
| − | <br clear=all> | + | <br clear="all"> |
[[File:newpads.jpg|thumb|left|250x250px|The new pads fitted]] | [[File:newpads.jpg|thumb|left|250x250px|The new pads fitted]] | ||
| Line 68: | Line 68: | ||
* Place the anti-squeal shims in place. | * Place the anti-squeal shims in place. | ||
* Smear a bit of Copper Grease on the rear of the shims to help reduce squeal. | * Smear a bit of Copper Grease on the rear of the shims to help reduce squeal. | ||
| − | <br clear=all> | + | <br clear="all"> |
[[File:gclamp.jpg|thumb|left|250x250px|Using a G-Clamp]] | [[File:gclamp.jpg|thumb|left|250x250px|Using a G-Clamp]] | ||
| Line 74: | Line 74: | ||
* Now the Piston has to be moved back. | * Now the Piston has to be moved back. | ||
* I use a G-Clamp and wind the piston back in until it is flush. | * I use a G-Clamp and wind the piston back in until it is flush. | ||
| − | <br clear=all> | + | * Pay attention to your brake fluid reservoir during compression as this will drive brake fluid back through the lines and can cause your reservoir to overflow. |
| + | <br clear="all"> | ||
[[File:completedpads.jpg|thumb|left|250x250px|All done]] | [[File:completedpads.jpg|thumb|left|250x250px|All done]] | ||
* Now swing the caliper back into position and bolt up the caliper bolt. | * Now swing the caliper back into position and bolt up the caliper bolt. | ||
| − | <br clear=all> | + | <br clear="all"> |
Re-fit the wheel and lower the vehicle. | Re-fit the wheel and lower the vehicle. | ||
| Line 91: | Line 92: | ||
{{Edited}} | {{Edited}} | ||
| − | [[Category:Howto]][[Category:Brakes]] | + | [[Category:Howto]] |
| + | [[Category:Brakes]] | ||
Revision as of 09:22, 21 January 2018
![]() The content of any article might be expanded / improved in the future - revisit it sometimes.
The content of any article might be expanded / improved in the future - revisit it sometimes.
![]() Seen a mistake? Know something that isn't written? Edit and change this article yourself!
Seen a mistake? Know something that isn't written? Edit and change this article yourself!
![]() Some images in the article (if present) can be enlarged by clicking on them.
Some images in the article (if present) can be enlarged by clicking on them.
Contents
Introduction
Changing the Brake Pads is a simple and quick job within the grasp of most people's abilities.
The symptoms of worn brake pads:
- Poor braking
- Pulling to one side
- Squealing and judder when braking
Changing the Brake Pads
Tools
- Standard metric sockets and spanners
- Assorted screwdrivers
- Circlip pliers (External)
- A G-Clamp or piston retraction tool
Removing the Caliper and pads
- First of all secure the car.
- Release the wheel nuts and jack up the car and remove the road wheel.
- This then reveals the brake caliper, this is the passenger side (nearside) caliper (UK) .
- Using a 12mm spanner, release the front caliper bolt (the left is the front of the car in this picture).
- Then loosen the same bolt on the rear of the caliper.
- The caliper then opens up using the rear bolt as a hinge.
- The pads are retained by small spring clips.
- A simple pull on the pads (horizontally away from the disk) should remove them.
- If the pads resist, gently prise out the pads with a small screwdriver - do not remove the spring clips).
- If you require new pads, spring clips or a caliper fitting kit then these are available in the BigJimny Store.
- Here are the new pads compared with the old.
- Note that ADK84224 are an aftermarket equivalent of the Suzuki part.
- New pads, are available in the BigJimny Store.
- The old are worn down to the metal.
- The new pads then simply push into place held by the spring clips.
- Place the anti-squeal shims in place.
- Smear a bit of Copper Grease on the rear of the shims to help reduce squeal.
- Now the Piston has to be moved back.
- I use a G-Clamp and wind the piston back in until it is flush.
- Pay attention to your brake fluid reservoir during compression as this will drive brake fluid back through the lines and can cause your reservoir to overflow.
- Now swing the caliper back into position and bolt up the caliper bolt.
Re-fit the wheel and lower the vehicle.
Torque Settings
Full details of the torque settings can be found in the reference data
Page last edited on 21/01/2018 by user RobNoxious


