

A place for more technical discussions. Please make sure you post in the correct section on the site, this way it keeps the site tidy AND ensures you get a more relevant answer.
centre console (CD/Radio) trim removal
Less
More
- Posts: 2318
- Thank you received: 360
30 Nov 2011 14:35 #26939
by Halford
centre console (CD/Radio) trim removal was created by Halford
just made up a guide for Suzuki Jimny 2005 on - Centre Console Trim Removal
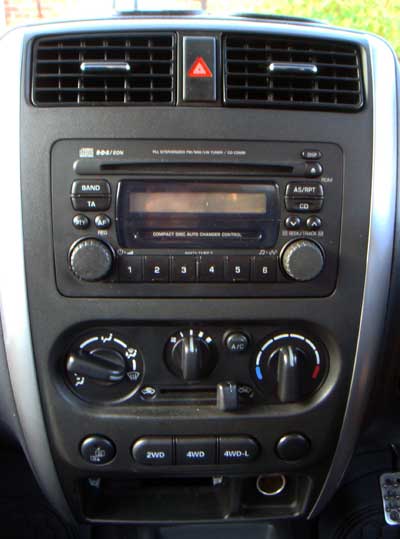
Firstly pull the ashtray out and remove the cigarette lighter
Next disconnect the power supply to the lighter socket – ref point 1 on the image
The power supply simply “pulls-offâ€ÂÂ
Next, undo the x3 screws holding the ashtray guide and remove
Now, put your hands under the lower trim facia and use your fingers to gently lift the xxx at ref points 2 and 3 (on pic above) whilst at the same time easing the lower trim towards you.
Once these clips are free, simply work your way up the panel gently lifting the facia until it’s free all the way up.
The facia trim should now be free, but you’ll need to disconnect the Hazard Button before you can pull it away.
Simply nip the sides of the block and gently pull it out.
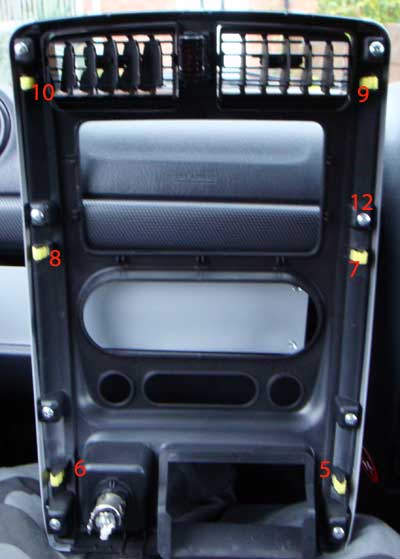
Now we have the trim removed
There are x6 clips (ref points 5 to 10) that need to be removed as they must be fitted to rear of the trim before refitting.
The easiest way to remove them is to turn them sideways then carefully extract.
Here we have the rear of the trim panel with the clips attached, ready for refitting.
These are the clips
I Believe the part ref is: A-pillar: 09409-06324
pdf file download here
[attachment:10]C:\fakepath\dash center panel removal.pdf[/attachment]
")
Firstly pull the ashtray out and remove the cigarette lighter
Next disconnect the power supply to the lighter socket – ref point 1 on the image
Attachment trim-remov-01.jpg not found
The power supply simply “pulls-offâ€ÂÂ
Attachment trim-remov-02_2011-11-30.jpg not found
Next, undo the x3 screws holding the ashtray guide and remove
Attachment trim-remov-03.jpg not found
Now, put your hands under the lower trim facia and use your fingers to gently lift the xxx at ref points 2 and 3 (on pic above) whilst at the same time easing the lower trim towards you.
Once these clips are free, simply work your way up the panel gently lifting the facia until it’s free all the way up.
The facia trim should now be free, but you’ll need to disconnect the Hazard Button before you can pull it away.
Simply nip the sides of the block and gently pull it out.
Attachment trim-remov-05.jpg not found
Now we have the trim removed
There are x6 clips (ref points 5 to 10) that need to be removed as they must be fitted to rear of the trim before refitting.
The easiest way to remove them is to turn them sideways then carefully extract.
Attachment trim-remov-06.jpg not found
Attachment trim-remov-07.jpg not found
Here we have the rear of the trim panel with the clips attached, ready for refitting.
These are the clips
I Believe the part ref is: A-pillar: 09409-06324
Attachment clips-console.jpg not found
pdf file download here
[attachment:10]C:\fakepath\dash center panel removal.pdf[/attachment]
Please Log in or Create an account to join the conversation.
- martysmith
- New Member
-

Public
Less
More
- Thank you received: 0
30 Nov 2011 19:32 #26962
by martysmith
Replied by martysmith on topic Re: centre console (CD/Radio) trim removal
did you find your rattle/noise ?
Please Log in or Create an account to join the conversation.
Less
More
- Posts: 2318
- Thank you received: 360
30 Nov 2011 19:56 #26971
by Halford
Replied by Halford on topic Re: centre console (CD/Radio) trim removal
yes sorted thanks ")
the rattle/creak was solved by tightening the fascia retaining screws (only needed 1/8th of a turn to nip them) shown at ref no. 12 in the 2nd last pic
still a noise to track down closer to the air-bag/windscreen - will pop off the dashboard covers at the screen and check the screws
the rattle/creak was solved by tightening the fascia retaining screws (only needed 1/8th of a turn to nip them) shown at ref no. 12 in the 2nd last pic
still a noise to track down closer to the air-bag/windscreen - will pop off the dashboard covers at the screen and check the screws
Please Log in or Create an account to join the conversation.
- martysmith
- New Member
-
Public
Less
More
- Thank you received: 0
30 Nov 2011 20:54 #26981
by martysmith
Replied by martysmith on topic Re: centre console (CD/Radio) trim removal
bet its dog biscuits doon the air vents :laugh: :laugh:
Please Log in or Create an account to join the conversation.
Less
More
- Posts: 2318
- Thank you received: 360
01 Dec 2011 11:39 #27005
by Halford
Replied by Halford on topic Re: centre console (CD/Radio) trim removal
took off the dashboard screw covers at the windscreen,
the centre screw was tight
but both side screws were loose - 3 turns on each :blink:
sorted
now I'll have to find something else to annoy me :whistle:
the centre screw was tight
but both side screws were loose - 3 turns on each :blink:
sorted
now I'll have to find something else to annoy me :whistle:
Please Log in or Create an account to join the conversation.
- darthloachie
- New Member
-
Public
Less
More
- Thank you received: 0
01 Dec 2011 12:11 #27006
by darthloachie
Replied by darthloachie on topic Re: centre console (CD/Radio) trim removal
come and drive ours - you won't know where to start :laugh:
Please Log in or Create an account to join the conversation.
Time to create page: 0.261 seconds