![]() The content of any article might be expanded / improved in the future - revisit it sometimes.
The content of any article might be expanded / improved in the future - revisit it sometimes.
![]() Seen a mistake? Know something that isn't written? Edit and change this article yourself!
Seen a mistake? Know something that isn't written? Edit and change this article yourself!
![]() Some images in the article (if present) can be enlarged by clicking on them.
Some images in the article (if present) can be enlarged by clicking on them.
Contents
Introduction
If your vehicle already has front fog lamps (in the front bumper) installed from the factory, you don't need to read this article. Enjoy life.
If you don't have factory-fitted front fog lamps, you might consider buying a pair from a local vehicle junkyard (taken from a dead Jimny).
Required parts
Main notes:
- The exact required parts depend on which front bumper revision you have.
- There have been three distinct front bumper revisions throughout Jimny's production lifetime.
- See the wiki article "Front bumper issues" for some details on front bumper revisions.
- Read about parts compatibility in the corresponding chapter below.
You need to obtain the following:
- A pair of fog lamps;
- A pair of mounting brackets;
- Exception is if you have the newest (3rd gen.) front bumper revision - it has integrated brackets.
- A rectangular button / switch for the driver's console;
- Possibly the wiring (preferably original cables with connectors etc.);
- Your vehicle might already have the required wiring.
- Possibly some more electrics like a relay, a fuse etc.);
- This part has not yet been investigated.
![]() You will have to cut out plastic blanks in the fog lamp openings in the front bumper. That operation is irreversible. You could glue the blanks back if you abandon the project, but it will hardly look virgin again. Therefore, it is recommended to obtain all the required parts (especially the electrics), and test-wire everything first before you finally cut the bumper and mount the lamps.
You will have to cut out plastic blanks in the fog lamp openings in the front bumper. That operation is irreversible. You could glue the blanks back if you abandon the project, but it will hardly look virgin again. Therefore, it is recommended to obtain all the required parts (especially the electrics), and test-wire everything first before you finally cut the bumper and mount the lamps.
Parts compatibility
Lamps
Fog lamps differ for 1st. gen front bumper and for later generations of front bumpers:
- Compatible front fog lamps for 1st gen. front bumper are P.N. 35500-74F50.
- An exception appear to be all Spanish (Santana-built) Jimnys with 1st gen. front bumper, which use front fog lamps P.N. 35500-63J00.
- Compatible front fog lamps for 2nd gen. and for 3rd gen. front bumper are P.N. 35500-63J04.
- This means that both the 2nd gen. and the 3rd gen. front bumper use the same fog lamps.
- Another compatible front fog lamp model for these front bumpers is P.N. 35500-63J02 (meant for the African market).
- These same fog lamps are also used on some Suzuki Alto, Celerio, Vitara 2 (1998-2005), Swift and SX4 vehicle models.
- All fog lamps are built to suit both the left and the right mounting position.
- Front fog lamp P.N. 35500-74F50 with bracket, for 1st gen front bumper
- Suzuki Jimny - OEM accessory 35500-74F50 - fog lamp, front (with bracket), for 1st gen. front bumper - A01.jpg
Front view
- Suzuki Jimny - OEM accessory 35500-74F50 - fog lamp, front (with bracket), for 1st gen. front bumper - A02.jpg
Rear view
- Front fog lamp P.N. 35500-63J04 with bracket, for 2nd and 3rd gen front bumper (bracket is not needed for 3rd gen front bumper)
- Suzuki Jimny - OEM accessory 35500-63J04 - fog lamp, front (with bracket), for 2nd and 3rd gen front bumper - A01.jpg
Lamp mounting brackets
- Mounting brackets differ for 1st gen. front bumper and for 2nd gen. front bumper.
- The 3rd gen. front bumper already has fog lamp brackets as its integral part.
- 3rd gen. front bumper - view from inside - enlarge the pictures and note the screw holes in the integrated front fog lamp brackets, to which the fog lamps directly attach
- Suzuki Jimny - front bumper, 3rd gen - focus on integrated front fog lamp brackets - A01.jpg
Left part
- Suzuki Jimny - front bumper, 3rd gen - focus on integrated front fog lamp brackets - A02.jpg
Right part
- Compatible fog lamp brackets for 1st gen. front bumper are P.N. 35526-81A01.
- These brackets are built to suit both the left side and the right mounting position.
- Compatible fog lamp brackets for 2nd gen. front bumper are:
- For the left mounting position: P.N. 35566-84A00;
- For the right mounting position: P.N. 35526-84A00;
Wiring
- The wiring appears to be the same for all vehicle revisions.
- The only exception is the different connector for the fog lamp used in the 1st gen. front bumper vs. the connector for the fog lamp used in the 2nd gen. and 3rd gen. front bumpers.
- Regarding the wiring, refer to a corresponding wiring diagram manual for your vehicle revision (and for donor's vehicle revision if needed).
- You can determine the exact name of the corresponding document in a wiki article "Manuals and Owners Guides".
- It might easily be possible that the required wiring is already present in the vehicle (there are some reports that Suzuki installed the wiring for the front fog lamps in every Jimny).
- Therefore, you should first check for the presence of the wires and connectors somewhere behind the front inner wheel arch liners, and inside the console in the cabin.
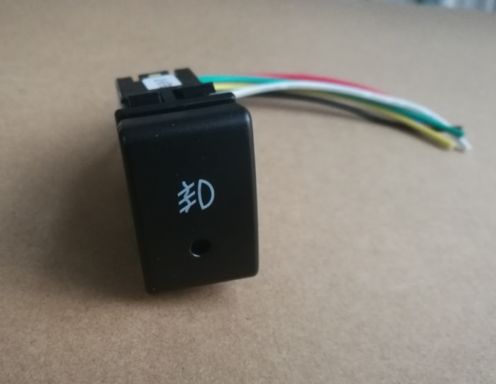
Console button / switch
- The OEM P.N. is 37270-76J00.
- The in-cabin console switch is the same in all Jimnys.
- This includes both pre-2006 Jimnys (with the older console version), and post-2005 Jimnys (with the newer console version).
- It appears that the same switch has been used for the front fog lamps in Suzuki Vitara 2 (a.k.a. "Grand Vitara") (1998-2005).
- In a Jimny, the switch is located next to rear fog lamp switch in a three-switch console cluster.
- The cluster is located to the left of the steering wheel (for LHD vehicles) or to the right of the steering wheel (for RHD vehicles).
- The switch is a "permanent press-in" type - after you press it, it stays pressed in until pressed again. The switch also contains a small light indicator which is lit when the switch is pressed in.
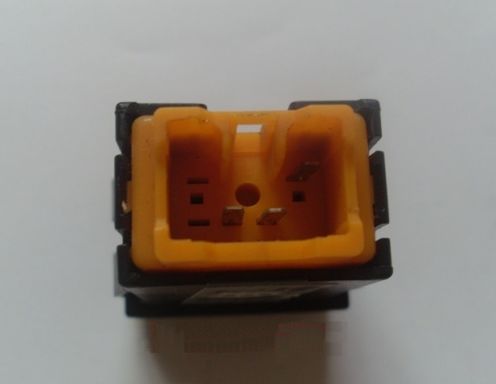
- In-cabin front fog lamp switch
How to install the switch in the console:
- Use a flat-bladed plastic (not metal!) tool to prise off the entire three-switch cluster from the console.
- It is best to prise it of a little bit at each side at a time.
- It will come off together with the three switches/blanks inside of it.
- When it comes off, you will be able to easily disengage a blank cover from it by squeezing the latches on the rear side of the cover.
- Then just push in the front fog lamp switch in the empty slot in the cluster.
- If the connector for the front fog lamp switch is already present behind in the hole, just connect it to the newly installed front fog lamp switch.
- Test if the switch works.
- Then just push the entire three-switch cluster back in the console - it will simply click in.
Page last edited on 8/08/2018 by user Bosanek


