Uncategorised files
Jump to navigation
Jump to search
Showing below up to 50 results in range #851 to #900.
View (previous 50 | next 50) (20 | 50 | 100 | 250 | 500)
 Transfer box from SJ 410 - speedometer conversion guide - A03.png 400 × 288; 113 KB
 Transfer box from SJ 410 - speedometer conversion guide - A04.png 400 × 288; 68 KB
 Transfer box from SJ 410 - speedometer conversion guide - A05.png 400 × 288; 145 KB
 Transfer box from SJ 410 - speedometer conversion guide - A06.png 400 × 304; 115 KB
 Transfer box from Suzuki SJ 41x installation guide - figure 01.png 464 × 304; 170 KB
 Transfer box from Suzuki SJ 41x installation guide - figure 02.png 464 × 304; 173 KB
 Transfer box from Suzuki SJ 41x installation guide - figure 03.png 464 × 304; 160 KB
 Transfer box from Suzuki SJ 41x installation guide - figure 04.png 464 × 304; 248 KB
 Transfer box from Suzuki SJ 41x installation guide - figure 05.png 464 × 304; 189 KB
 Transfer box from Suzuki SJ 41x installation guide - figure 06.png 464 × 304; 184 KB
 Transfer box from Suzuki SJ 41x installation guide - figure 07.png 464 × 304; 199 KB
 Transfer box from Suzuki SJ 41x installation guide - figure 08.png 464 × 304; 187 KB
 Transfer box from Suzuki SJ 41x installation guide - figure 09.png 464 × 304; 217 KB
 Transfer box from Suzuki SJ 41x installation guide - figure 10.png 464 × 304; 222 KB
 Transfer box from Suzuki SJ 41x installation guide - figure 11.png 464 × 304; 272 KB
 Transfer box from Suzuki SJ 41x installation guide - figure 12.png 464 × 304; 161 KB
 Transfer box from Suzuki SJ 41x installation guide - figure 13.png 464 × 304; 181 KB
 Transfer box from Suzuki SJ 41x installation guide - figure 14.png 464 × 304; 216 KB
 Transfer box from Suzuki SJ 41x installation guide - figure 15.png 304 × 464; 166 KB
 Transfer box from Suzuki SJ 41x installation guide - figure 16.png 464 × 304; 178 KB
 Tyre Bridgestone Potenza RE92 - representative image.jpg 456 × 632; 73 KB
 Tyre Bridgestone Turanza AR10 - representative image.jpg 672 × 864; 105 KB
 Tyre Continental WinterContact TS800 - representative image.jpg 352 × 496; 40 KB
 Tyre Continental WinterExtremeContact - representative image.jpg 544 × 672; 63 KB
 Tyre Falken Wildpeak WP AT01 - representative image.jpg 412 × 584; 48 KB
 Tyre Fulda Kristall Control HP2 - representative image.jpg 424 × 576; 62 KB
 Tyre General Grabber AT3 - representative image.jpg 360 × 496; 59 KB
 Tyre Goodyear UltraGrip plus SUV - representative image.jpg 360 × 528; 38 KB
 Tyre Goodyear Wrangler AT-SA - representative image.jpg 480 × 704; 78 KB
 Tyre Hankook Optimo H724 - representative image.jpg 304 × 432; 31 KB
 Tyre Hankook Ventus V12 Evo K110 - representative image.jpg 352 × 496; 46 KB
 Tyre Kumho Road Venture MT51 - representative image.jpg 352 × 496; 37 KB
 Tyre Kumho Road Venture MT KL71 - representative image.jpg 304 × 448; 29 KB
 Tyre Maxxis Escapade CUV - representative image.jpg 303 × 500; 54 KB
 Tyre Michelin Latitude Cross - representative image.jpg 368 × 528; 46 KB
 Tyre Michelin Pilot Primacy - representative image.jpg 352 × 496; 60 KB
 Tyre Pirelli P-Zero System Asimmetrico.jpg 352 × 496; 36 KB
 Tyre Uniroyal RainSport 3 - representative image.jpg 496 × 704; 81 KB
 Tyre Yokohama-Geolandar-HT-S - representative image.jpg 400 × 496; 52 KB
 Tyre Yokohama Geolandar MT - representative image.jpg 400 × 496; 49 KB
 Tyre sidewall damage - A01.jpg 1,280 × 727; 235 KB
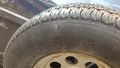 Tyre sidewall damage - B01.jpg 1,280 × 720; 277 KB
 Tyre with reduced air pressure on a Jimny - A01.jpg 960 × 720; 212 KB
 Tyre with reduced air pressure on a Jimny - A02.jpg 960 × 720; 199 KB
 Unbolt caliper.jpg 480 × 320; 21 KB
 Using old flange.jpg 638 × 425; 34 KB
 Vacuum and manual wheel hub head - A01.jpg 800 × 600; 76 KB
 Vacuum hub head to fixed hub head conversion guide - figure 01.jpg 1,200 × 900; 361 KB
 Vacuum hub head to fixed hub head conversion guide - figure 02.jpg 1,200 × 900; 349 KB


