Jump to navigation
Jump to search
![]() The content of any article might be expanded / improved in the future - revisit it sometimes.
The content of any article might be expanded / improved in the future - revisit it sometimes.
![]() Seen a mistake? Know something that isn't written? Edit and change this article yourself!
Seen a mistake? Know something that isn't written? Edit and change this article yourself!
![]() Some images in the article (if present) can be enlarged by clicking on them.
Some images in the article (if present) can be enlarged by clicking on them.
Introduction
4th generation Jimnys come fitted with Daytime Running Lights (DRLs) fitted as standard. The DRLs use halogen P13W bulbs, contained within the same bumper fitment as the fog lights (if installed).
LED bulb installation
- With LED headlights fitted as standard to the SZ5 model, the use of halogen DRLs can look odd and some owners may wish to replace the standard bulbs with LED equivalents. This image contrasts halogen and LED bulbs installed in the DRL fitting. Both images were taken using the same shutter speed/aperture/ISO and white balance.
- Care should be taken to select CANbus compatible P13W LED bulbs to avoid erroneous bulb-failure warning lights
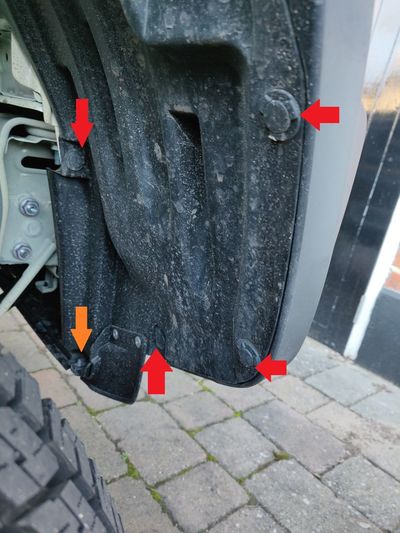
- In order to get enough room to swap the bulbs, put the car on full lock towards the side you're working on. You then need to remove four push pins (red arrows) and one Philips screw (orange arrow) per side. Screw head is underneath the bumper.
- Remove push pins by gently prising the centre section with a small flat screwdriver.
- Pull loosened pin out.
- Remove single Philips screw beneath bumper.
- Carefully bend inner bumper backwards to access light fitting.
- Fog and DRL bulbs are both in the same fitting. DRL is at the bottom, fog at the top. First remove the wiring connection by squeezing the fitting and pulling it off. Then grasp the bulb itself, rotate counter clockwise and remove.
- Insert new bulb, turn clockwise to lock in place and then reattach wiring harness. Reverse previous steps to refit bumper inner.


