Difference between revisions of "Front speaker upgrade (Jimny 4)"
| Line 1: | Line 1: | ||
{{intro-notes}} | {{intro-notes}} | ||
| + | |||
== Introduction == | == Introduction == | ||
| + | |||
{{Gen4|}} | {{Gen4|}} | ||
| + | Gen4 Jimnys are factory fitted with a pair of dual cone 10 cm front speakers. These can be replaced to improve the quality of the stereo sound. | ||
| − | This guide | + | This guide contains instructions on how to replace the stock factory front speakers in a Gen4 Jimny (2018 - ongoing). |
| − | |||
== Tools needed == | == Tools needed == | ||
| − | * | + | |
| + | {{Gen4|}} | ||
| + | * Philips screwdriver; | ||
* Small flat head screwdriver; | * Small flat head screwdriver; | ||
| − | * 10 | + | * Pliers; |
| − | * | + | |
| − | * | + | == Guide == |
| − | * | + | |
| − | * | + | {{Gen4|}} |
| − | * | + | The front speakers in a Jimny 4 are located in side doors. |
| + | |||
| + | Suzuki offers an accessory bracket kit allowing for these 10 cm stock speakers to be replaced with 13 cm speakers. | ||
| + | |||
| + | This guide is based on the installation of aftermarket 13 cm speakers. | ||
| + | |||
| + | The YouTube video below shows the installation process | ||
| + | |||
| + | * [https://youtu.be/Ti5HH0Yopf0 Video - how to fit the upgrade kit] | ||
| + | |||
| + | === Parts === | ||
| + | |||
| + | |||
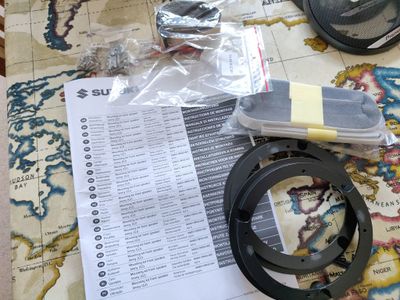
| + | * [https://www.bigjimny.com/store/front-speaker-mounting-upgrade-kit.html Front speaker upgrade bracket kit] | ||
| + | ** Suzuki P.N. 990E0-78R32-000; | ||
| + | ** The bracket kit includes all the parts needed for installation except the speakers. | ||
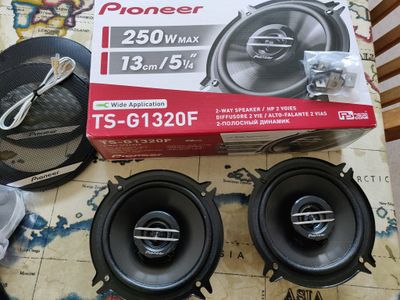
| + | * Suitable 13 cm front speakers; | ||
| + | ** Pioneer TS-G1320F are known to fit in this position, and are supplied as OEM parts for installation in the rear of Jimny 4. | ||
| + | |||
| + | |||
| + | |||
| + | [[File:gen4_frspk002.jpg|400px|thumb|left|]] | ||
| + | <br clear=all> | ||
| + | |||
| + | [[File:gen4_frspk001.jpg|400px|thumb|left|]] | ||
| + | <br clear=all> | ||
| + | |||
| + | |||
| + | === Trim removal === | ||
| + | |||
| + | |||
| + | [[File:gen4_frspk003.jpg|400px|thumb|left|]] | ||
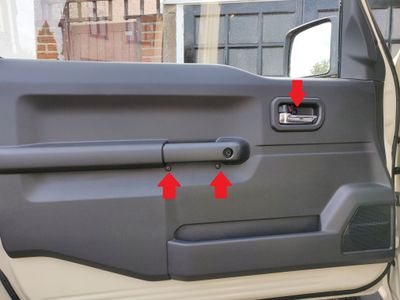
| + | * First remove the two Philips screws below the door handle and one screw in the door release recess, indicated in the picture. | ||
| + | <br clear=all> | ||
| + | |||
| + | |||
| + | [[File:gen4_frspk019.jpg|400px|thumb|left|]] | ||
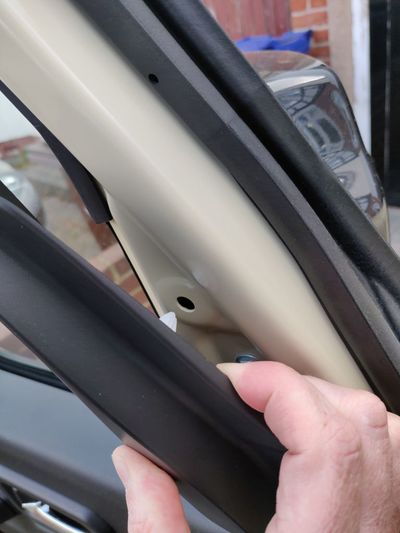
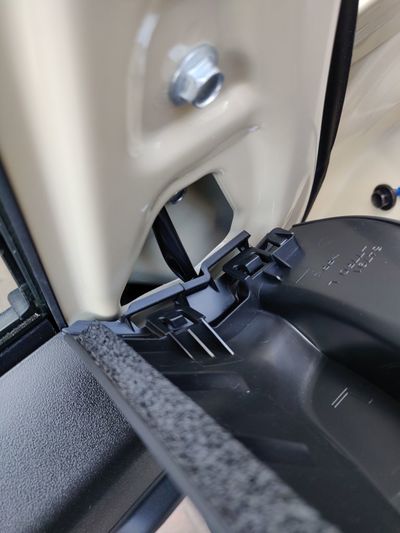
| + | * Next, remove the trim directly above the door panel by pulling from the top leading edge to release the single white clip. | ||
| + | <br clear=all> | ||
| + | |||
| + | |||
| + | [[File:gen4_frspk023.jpg|400px|thumb|left|]] | ||
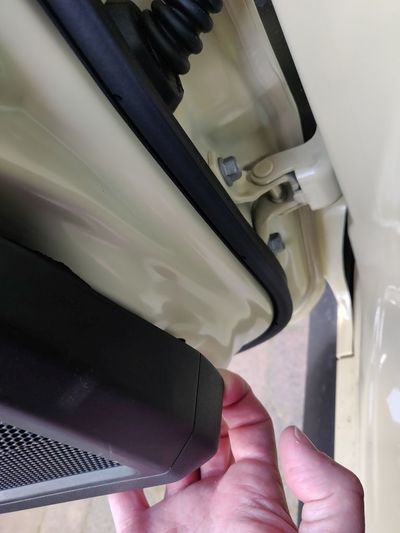
| + | * Then pull gently towards you and upwards to release the latches at the bottom connecting it to the door panel. | ||
| + | <br clear=all> | ||
| + | |||
| + | |||
| + | [[File:gen4_frspk020.jpg|400px|thumb|left|]] | ||
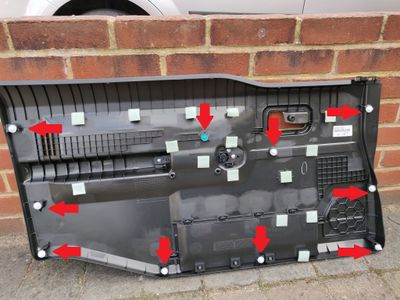
| + | * The door panel is secured with ten clips, nine white and one cyan. | ||
| + | * The cyan one seems to be more robust and more likely to detach from the panel and remain in the door. | ||
| + | * Clip positions are indicated in the picture. | ||
| + | <br clear=all> | ||
| + | |||
| + | |||
| + | [[File:gen4_frspk018.jpg|400px|thumb|left|]] | ||
| + | * Starting from the bottom leading edge of the door below the speaker grille, pull the trim away from the door panel to release each clip in turn. | ||
| + | * Sharp tugs are more effective than gradual pressure. | ||
| + | * Work your way along the bottom then up each side releasing the clips. | ||
| + | * To release the central white and cyan clip, it may help to slide your arm up behind the panel from underneath. | ||
| + | * Once all clips have been released, gently unhook the top lip of the trim from the door panel. | ||
| + | <br clear=all> | ||
| + | |||
| + | |||
| + | [[File:gen4_frspk006.jpg|400px|thumb|left|]] | ||
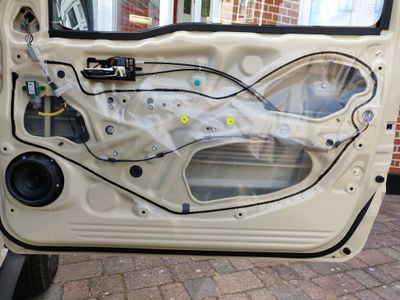
| + | * It is likely that some clips will have detached from the trim and still be located in the door, such as the cyan clip in this image. | ||
| + | * Using pliers and a suitable flat head screwdriver, lever these out from the door and place them in the correct locations in the door trim. | ||
| + | * Otherwise, reinstalling the trim back onto the door will be difficult. | ||
| + | <br clear=all> | ||
| + | |||
| + | |||
| + | === Recommended additional works === | ||
| + | |||
| + | |||
| + | While the side door trim is removed in order to install better front speakers, you might use the opportunity to perform [[Interior works in cabin while trim is removed|'''some additional works''']] in the exposed side doors along the way. | ||
| + | |||
| + | |||
| + | === Speaker replacement === | ||
| + | |||
| + | |||
| + | [[File:gen4_frspk007.jpg|400px|thumb|left|]] | ||
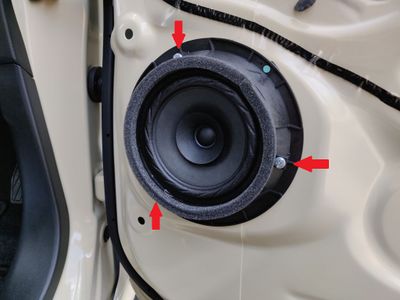
| + | * Using a Philips screwdriver, undo the three retaining screws holding the current speaker in place. | ||
| + | <br clear=all> | ||
| + | |||
| + | |||
| + | [[File:gen4_frspk008.jpg|400px|thumb|left|]] | ||
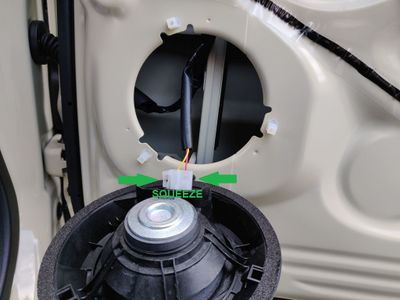
| + | * Pull the speaker away from the door and squeeze the wiring plug to remove from the socket. | ||
| + | <br clear=all> | ||
| + | |||
| + | |||
| + | [[File:gen4_frspk021.jpg|400px|thumb|left|]] | ||
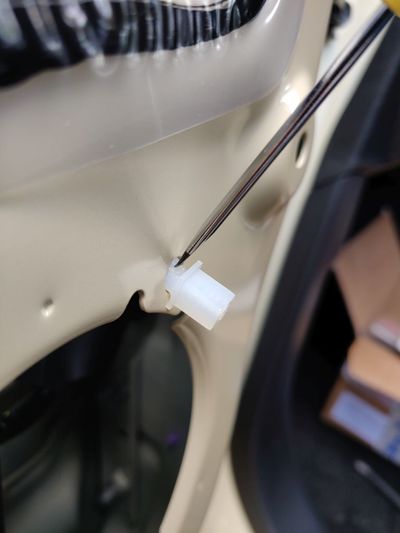
| + | * Remove the three white plastic mounting points by compressing one side with a small flat head screwdriver and rotating. | ||
| + | <br clear=all> | ||
| + | |||
| + | |||
| + | [[File:gen4_frspk010.jpg|400px|thumb|left|]] | ||
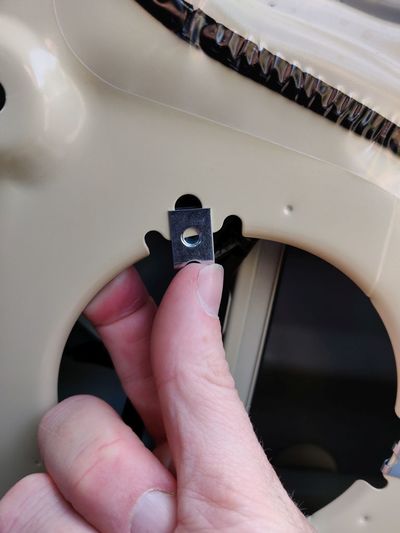
| + | * Push three metal clips into place. | ||
| + | * Each will click into place over the existing hole in the door panel. | ||
| + | <br clear=all> | ||
| + | |||
| + | |||
| + | [[File:gen4_frspk011.jpg|400px|thumb|left|]] | ||
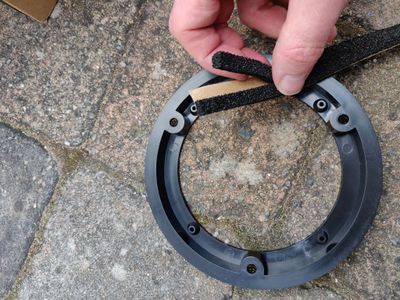
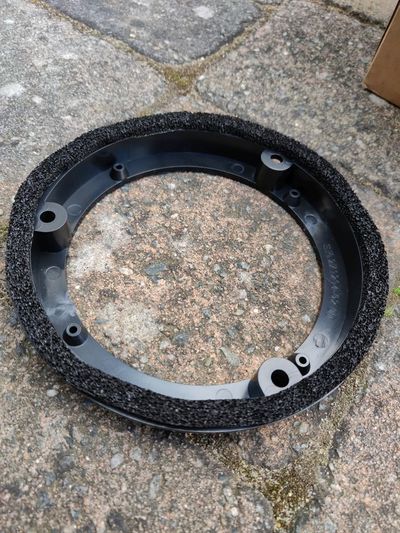
| + | * Using one half of the coarser, black foam supplied, line the face of the mounting ring that will sit against the door panel. | ||
| + | <br clear=all> | ||
| + | |||
| + | [[File:gen4_frspk012.jpg|400px|thumb|left|]] | ||
| + | <br clear=all> | ||
| + | |||
| + | |||
| + | [[File:gen4_frspk013.jpg|400px|thumb|left|]] | ||
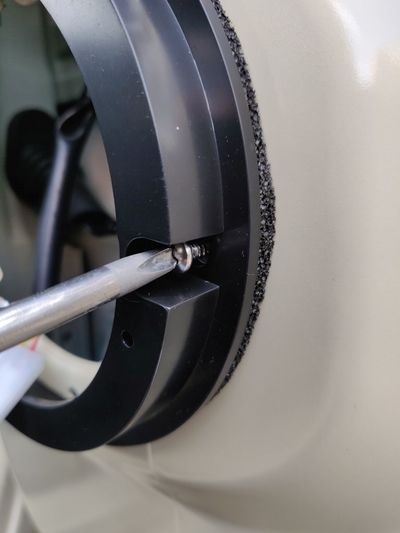
| + | * Screw the mounting ring into place using three of the self-tapping screws supplied with the mounting kit. | ||
| + | <br clear=all> | ||
| + | |||
| + | |||
| + | [[File:gen4_frspk014.jpg|400px|thumb|left|]] | ||
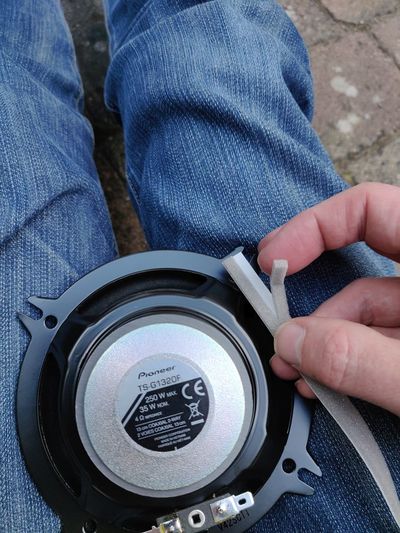
| + | * Apply one half of the thin grey foam to the rear of your new speaker, adjacent to the speaker cone. | ||
| + | <br clear=all> | ||
| + | |||
| + | |||
| + | [[File:gen4_frspk015.jpg|400px|thumb|left|]] | ||
| + | * Then connect the supplied wiring harness to the speaker terminals. | ||
| + | <br clear=all> | ||
| + | |||
| − | * | + | [[File:gen4_frspk016.jpg|400px|thumb|left|]] |
| − | * | + | * Connect the wiring harness to the plug in the door panel and screw the speaker to the mounting ring, using self tapping screws that came with your chosen speaker. |
| − | + | * Be very careful not to slip the screwdriver while screwing and damage the speaker cone. | |
| − | + | <br clear=all> | |
| − | |||
| − | |||
| − | |||
| − | + | [[File:gen4_frspk017.jpg|400px|thumb|left|]] | |
| − | * | + | * Apply half of the thicker grey foam around the front edge of the speaker body, taking care not to let it adhere to the speaker cone itself. |
| − | * | + | * Pinch the foam around the raised lip and make sure the foam is angled away from the center of the speaker, so that it doesn't fold over the cone when the door trim is reinstalled. |
| − | + | <br clear=all> | |
| − | |||
| − | |||
| − | + | * Leave the door trim detached for now and repeat the installation on the other door. | |
| − | * | + | * Once complete, test that both speakers work as expected. |
| − | * | + | ** Test should include both audio operation and the occurrence of any vibrations or rattles while the speaker is active. |
| − | * | ||
| − | |||
| − | + | === Returning the trim back into position === | |
| − | |||
| − | |||
| − | |||
| − | |||
| − | ' | + | * To replace the door trim, start at the top, hooking the top of the trim panel over the black rubberised strip at the top of the door. |
| + | ** Check alignment by looking to see if the trim clips are in position to locate into the holes in the door panel. | ||
| + | * Starting from the top, work your way down, pushing on the trim to click the clips into place. | ||
| + | ** Don't forget to push below the door release lever and handle to click the two central clips into place. | ||
| + | * Reinstall the three Philips screws in the door release recess (1) and below the door handle (2 & 3). | ||
| − | |||
| − | + | Finally, enjoy your improved audio experience! | |
| − | |||
| − | |||
| − | |||
| − | + | [[Category:Accessories - gen4]] | |
| − | + | [[Category:Infotainment - gen4]] | |
| − | + | [[Category:Howto - gen4]] | |
Latest revision as of 21:59, 19 November 2019
![]() The content of any article might be expanded / improved in the future - revisit it sometimes.
The content of any article might be expanded / improved in the future - revisit it sometimes.
![]() Seen a mistake? Know something that isn't written? Edit and change this article yourself!
Seen a mistake? Know something that isn't written? Edit and change this article yourself!
![]() Some images in the article (if present) can be enlarged by clicking on them.
Some images in the article (if present) can be enlarged by clicking on them.
Contents
Introduction
Gen4 Jimnys are factory fitted with a pair of dual cone 10 cm front speakers. These can be replaced to improve the quality of the stereo sound.
This guide contains instructions on how to replace the stock factory front speakers in a Gen4 Jimny (2018 - ongoing).
Tools needed
- Philips screwdriver;
- Small flat head screwdriver;
- Pliers;
Guide
The front speakers in a Jimny 4 are located in side doors.
Suzuki offers an accessory bracket kit allowing for these 10 cm stock speakers to be replaced with 13 cm speakers.
This guide is based on the installation of aftermarket 13 cm speakers.
The YouTube video below shows the installation process
Parts
- Front speaker upgrade bracket kit
- Suzuki P.N. 990E0-78R32-000;
- The bracket kit includes all the parts needed for installation except the speakers.
- Suitable 13 cm front speakers;
- Pioneer TS-G1320F are known to fit in this position, and are supplied as OEM parts for installation in the rear of Jimny 4.
Trim removal
- First remove the two Philips screws below the door handle and one screw in the door release recess, indicated in the picture.
- Next, remove the trim directly above the door panel by pulling from the top leading edge to release the single white clip.
- Then pull gently towards you and upwards to release the latches at the bottom connecting it to the door panel.
- The door panel is secured with ten clips, nine white and one cyan.
- The cyan one seems to be more robust and more likely to detach from the panel and remain in the door.
- Clip positions are indicated in the picture.
- Starting from the bottom leading edge of the door below the speaker grille, pull the trim away from the door panel to release each clip in turn.
- Sharp tugs are more effective than gradual pressure.
- Work your way along the bottom then up each side releasing the clips.
- To release the central white and cyan clip, it may help to slide your arm up behind the panel from underneath.
- Once all clips have been released, gently unhook the top lip of the trim from the door panel.
- It is likely that some clips will have detached from the trim and still be located in the door, such as the cyan clip in this image.
- Using pliers and a suitable flat head screwdriver, lever these out from the door and place them in the correct locations in the door trim.
- Otherwise, reinstalling the trim back onto the door will be difficult.
Recommended additional works
While the side door trim is removed in order to install better front speakers, you might use the opportunity to perform some additional works in the exposed side doors along the way.
Speaker replacement
- Using a Philips screwdriver, undo the three retaining screws holding the current speaker in place.
- Pull the speaker away from the door and squeeze the wiring plug to remove from the socket.
- Remove the three white plastic mounting points by compressing one side with a small flat head screwdriver and rotating.
- Push three metal clips into place.
- Each will click into place over the existing hole in the door panel.
- Using one half of the coarser, black foam supplied, line the face of the mounting ring that will sit against the door panel.
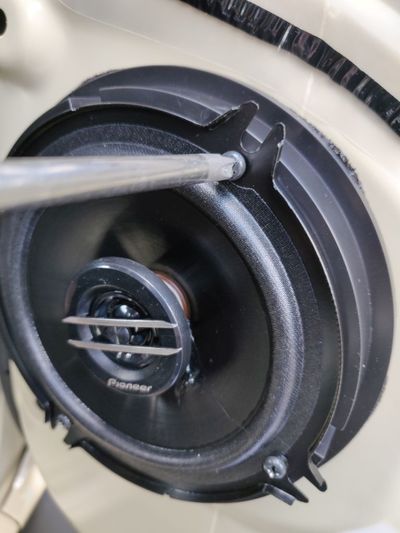
- Screw the mounting ring into place using three of the self-tapping screws supplied with the mounting kit.
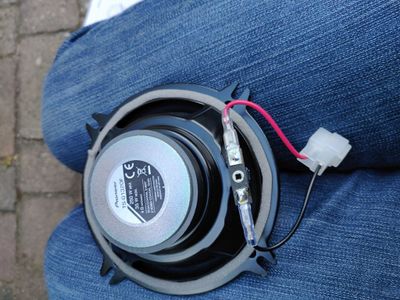
- Apply one half of the thin grey foam to the rear of your new speaker, adjacent to the speaker cone.
- Then connect the supplied wiring harness to the speaker terminals.
- Connect the wiring harness to the plug in the door panel and screw the speaker to the mounting ring, using self tapping screws that came with your chosen speaker.
- Be very careful not to slip the screwdriver while screwing and damage the speaker cone.
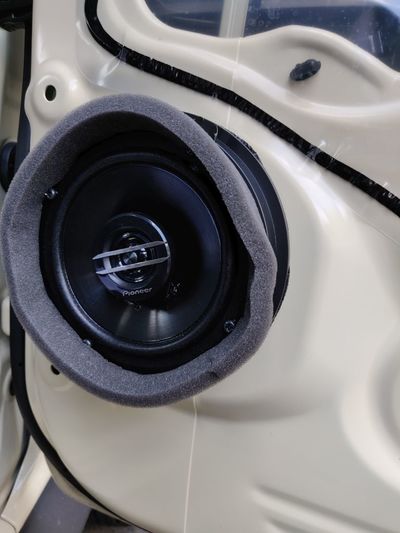
- Apply half of the thicker grey foam around the front edge of the speaker body, taking care not to let it adhere to the speaker cone itself.
- Pinch the foam around the raised lip and make sure the foam is angled away from the center of the speaker, so that it doesn't fold over the cone when the door trim is reinstalled.
- Leave the door trim detached for now and repeat the installation on the other door.
- Once complete, test that both speakers work as expected.
- Test should include both audio operation and the occurrence of any vibrations or rattles while the speaker is active.
Returning the trim back into position
- To replace the door trim, start at the top, hooking the top of the trim panel over the black rubberised strip at the top of the door.
- Check alignment by looking to see if the trim clips are in position to locate into the holes in the door panel.
- Starting from the top, work your way down, pushing on the trim to click the clips into place.
- Don't forget to push below the door release lever and handle to click the two central clips into place.
- Reinstall the three Philips screws in the door release recess (1) and below the door handle (2 & 3).
Finally, enjoy your improved audio experience!
