Difference between revisions of "Front Grille"
(Reprocessed the article to clearly indicate which content refers to Jimnys gen3 and which refers to Jimnys gen4) |
(Added pictures of chromed front grille for Jimny 3 and rough description on how to replace it) |
||
| Line 6: | Line 6: | ||
{{Gen3|}}{{Gen4|}} | {{Gen3|}}{{Gen4|}} | ||
| − | Suzuki offers an accessory front grille option for Jimnys 3 built between 2012 and 2018 ( | + | Suzuki offers an accessory front grille option for Jimnys 3 built between 2012 and 2018 (which have separate front grille from the hood) and also an accessory front grille for Jimnys 4: |
* The accessory grille for Jimny 3 replaces the factory grille. | * The accessory grille for Jimny 3 replaces the factory grille. | ||
** It has the same shape, but it has chromed finish. | ** It has the same shape, but it has chromed finish. | ||
| + | * P.N.: <font face="Courier">99000-990C5-006</font>; | ||
* The accessory grille for Jimny 4 replaces the matt black standard grille (with vertical slats and stylised 'S' logo). | * The accessory grille for Jimny 4 replaces the matt black standard grille (with vertical slats and stylised 'S' logo). | ||
** It is a gloss gunmetal grey grille with black honeycomb mesh and 'Suzuki' logo in white. | ** It is a gloss gunmetal grey grille with black honeycomb mesh and 'Suzuki' logo in white. | ||
| Line 16: | Line 17: | ||
{{Gen3|}} | {{Gen3|}} | ||
| − | + | ||
| + | <gallery widths="400px" heights="225px" class=center caption="Jimny 3 chromed front grille P.N. 99000-990C5-006, for vehicles built between 2012 and 2018" > | ||
| + | File:Suzuki Jimny 3 - OEM accessory 99000-990C5-006 - front grille, 2012-2018, chromed - A01.jpg | ||
| + | File:Suzuki Jimny 3 - OEM accessory 99000-990C5-006 - front grille, 2012-2018, chromed - B01.jpg | ||
| + | </gallery> | ||
| + | |||
| + | |||
| + | The replacement procedure generally consists of completely removing the stock front grille and installing the chromed front grille in its place, using the original clips and screws which had held the stock grille in place. | ||
| + | |||
| + | Replacement should be dead simple to do - just standing in front of the vehicle on a parking lot and using only bare hands and suitable screwdrivers. | ||
Revision as of 07:57, 12 March 2019
![]() The content of any article might be expanded / improved in the future - revisit it sometimes.
The content of any article might be expanded / improved in the future - revisit it sometimes.
![]() Seen a mistake? Know something that isn't written? Edit and change this article yourself!
Seen a mistake? Know something that isn't written? Edit and change this article yourself!
![]() Some images in the article (if present) can be enlarged by clicking on them.
Some images in the article (if present) can be enlarged by clicking on them.
![]() This article is just an embryo. It is an idea for someone to "pick up" onto and to expand the article further.
This article is just an embryo. It is an idea for someone to "pick up" onto and to expand the article further.
Introduction
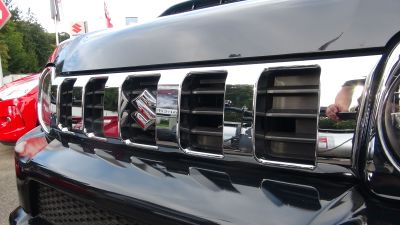
Suzuki offers an accessory front grille option for Jimnys 3 built between 2012 and 2018 (which have separate front grille from the hood) and also an accessory front grille for Jimnys 4:
- The accessory grille for Jimny 3 replaces the factory grille.
- It has the same shape, but it has chromed finish.
- P.N.: 99000-990C5-006;
- The accessory grille for Jimny 4 replaces the matt black standard grille (with vertical slats and stylised 'S' logo).
- It is a gloss gunmetal grey grille with black honeycomb mesh and 'Suzuki' logo in white.
Grille replacement on Jimny 3
- Jimny 3 chromed front grille P.N. 99000-990C5-006, for vehicles built between 2012 and 2018
The replacement procedure generally consists of completely removing the stock front grille and installing the chromed front grille in its place, using the original clips and screws which had held the stock grille in place.
Replacement should be dead simple to do - just standing in front of the vehicle on a parking lot and using only bare hands and suitable screwdrivers.
Grille replacement on Jimny 4
- From under the bonnet remove two plastic push rivets by prising out the centre pins using a small flat-head screwdriver.
- At the bottom of the grille in the lower horizontal slot release two clips.
- Once those are done there are a series of trim clips around the indicator area and along the top edge. Just pull firmly.
Page last edited on 12/03/2019 by user Bosanek


