Difference between revisions of "Headlight alarm buzzer installation"
m (Bosanek moved page Installing a headlight alarm buzzer to Headlight alarm buzzer installation without leaving a redirect: Standardized the title) |
|||
| (4 intermediate revisions by 2 users not shown) | |||
| Line 3: | Line 3: | ||
== Introduction == | == Introduction == | ||
| + | {{Gen3|}} | ||
Some early Jimnys don't come from factory with a headlight alarm when the car is turned off but the headlights are left on. This makes it easy to accidentally leave your headlights on overnight and come back to a flat battery. A headlight buzzer can be fairly easily wired up to the ignition switch using a piezo buzzer and a relay. | Some early Jimnys don't come from factory with a headlight alarm when the car is turned off but the headlights are left on. This makes it easy to accidentally leave your headlights on overnight and come back to a flat battery. A headlight buzzer can be fairly easily wired up to the ignition switch using a piezo buzzer and a relay. | ||
| + | |||
== Tools and parts needed == | == Tools and parts needed == | ||
| + | |||
* #2 Philips screwdriver | * #2 Philips screwdriver | ||
| Line 18: | Line 21: | ||
* Electric piezo buzzer | * Electric piezo buzzer | ||
* Wires | * Wires | ||
| + | |||
== Procedure == | == Procedure == | ||
| + | |||
=== Steering column lower trim panel removal === | === Steering column lower trim panel removal === | ||
| + | |||
| + | |||
* Underneath the steering wheel is a plastic panel with two screws at the bottom | * Underneath the steering wheel is a plastic panel with two screws at the bottom | ||
* Remove the screws and slide the panel out to access the wiring | * Remove the screws and slide the panel out to access the wiring | ||
| Line 27: | Line 34: | ||
=== Identifying the correct pins === | === Identifying the correct pins === | ||
| + | |||
| + | |||
* The 18 pin connector between the steering column and the car's wiring has the ignition, headlight switch and ground cables | * The 18 pin connector between the steering column and the car's wiring has the ignition, headlight switch and ground cables | ||
* To find which cable is which, attach a multimeter to ground (part of the accelerator pedal arm can be used as a ground) | * To find which cable is which, attach a multimeter to ground (part of the accelerator pedal arm can be used as a ground) | ||
| Line 34: | Line 43: | ||
* The headlight switch pin should be 12V when the headlights are turned on and 0V when they are off. | * The headlight switch pin should be 12V when the headlights are turned on and 0V when they are off. | ||
| − | Your car's wiring may differ so be sure to test the voltages before stripping any wires. | + | Your car's wiring may differ, so be sure to test the voltages before stripping any wires. |
| − | + | ||
| − | Wire colouration may differ, | + | |
| + | [[File:Required pins for headlight buzzer.png|thumb|left|500px|Required pins for headlight buzzer]] | ||
| + | |||
| + | * This diagram shows the pins that were tapped into in the tested car (1999 model). | ||
| + | * This pin diagram is as viewed from the back end (wire end) of the plug (ECU end, not steering column end). | ||
| + | <br clear=all> | ||
| + | |||
| + | |||
| + | Wire colouration may differ. In the tested car, the wires were as follows: | ||
| + | |||
{| class="wikitable" | {| class="wikitable" | ||
|- | |- | ||
| Line 47: | Line 65: | ||
| 18 || Ground || Black | | 18 || Ground || Black | ||
|} | |} | ||
| + | |||
=== Installing the relay and buzzer === | === Installing the relay and buzzer === | ||
| + | |||
| + | |||
| + | [[File:Connection of wires for headlight buzzer.png|thumb|left|480px|Connection of wires for headlight buzzer]] | ||
| + | |||
* Disconnect the 18 pin plug coming from the steering column | * Disconnect the 18 pin plug coming from the steering column | ||
* Strip each of the 3 wires using a wire stripper (try to keep the wire intact and just strip the outer housing). | * Strip each of the 3 wires using a wire stripper (try to keep the wire intact and just strip the outer housing). | ||
* Wrap some new wire around each of the wires coming from the loom and cover the connection with electrical tape. | * Wrap some new wire around each of the wires coming from the loom and cover the connection with electrical tape. | ||
| − | [[File: | + | <br clear=all> |
| − | * Connect the wires and the piezo buzzer to the relay as shown in the diagram | + | |
| − | + | ||
| + | [[File:Headlight buzzer relay connection.png|thumb|left|480px|Headlight buzzer relay connection]] | ||
| + | |||
| + | * Connect the wires and the piezo buzzer to the relay as shown in the diagram. | ||
| + | <br clear=all> | ||
| + | |||
=== Re-assembly === | === Re-assembly === | ||
| + | |||
| + | |||
* Tuck the relay, piezo and excess wire up inside the steering column (secure with tape, ziptie or your favourite method of DIY fastening) | * Tuck the relay, piezo and excess wire up inside the steering column (secure with tape, ziptie or your favourite method of DIY fastening) | ||
* Replace the trim panel with the screws removed earlier. | * Replace the trim panel with the screws removed earlier. | ||
* Test out the ear grating headlight buzzer by turning off the ignition and flicking on the headlights | * Test out the ear grating headlight buzzer by turning off the ignition and flicking on the headlights | ||
* Enjoy not waking up to a flat battery | * Enjoy not waking up to a flat battery | ||
| + | |||
== Related forum discussions == | == Related forum discussions == | ||
| + | |||
| + | |||
The following forum discussions contain useful info regarding these issues: | The following forum discussions contain useful info regarding these issues: | ||
* [https://www.bigjimny.com/index.php/forum/6-jimny-chat/57617-head-light-warning-buzzer] | * [https://www.bigjimny.com/index.php/forum/6-jimny-chat/57617-head-light-warning-buzzer] | ||
| + | |||
| + | |||
| + | {{Edited}} | ||
| + | |||
| + | [[Category:Electrical - gen3]] | ||
| + | [[Category:Howto - gen3]] | ||
Latest revision as of 13:46, 13 December 2021
![]() The content of any article might be expanded / improved in the future - revisit it sometimes.
The content of any article might be expanded / improved in the future - revisit it sometimes.
![]() Seen a mistake? Know something that isn't written? Edit and change this article yourself!
Seen a mistake? Know something that isn't written? Edit and change this article yourself!
![]() Some images in the article (if present) can be enlarged by clicking on them.
Some images in the article (if present) can be enlarged by clicking on them.
Contents
Introduction
Some early Jimnys don't come from factory with a headlight alarm when the car is turned off but the headlights are left on. This makes it easy to accidentally leave your headlights on overnight and come back to a flat battery. A headlight buzzer can be fairly easily wired up to the ignition switch using a piezo buzzer and a relay.
Tools and parts needed
- #2 Philips screwdriver
- Electrical insulation tape
- Heat shrink tubing
- Soldering iron
- Solder
- Wire strippers
- Multimeter
- 12V, 4 pin, normally open relay
- Electric piezo buzzer
- Wires
Procedure
Steering column lower trim panel removal
- Underneath the steering wheel is a plastic panel with two screws at the bottom
- Remove the screws and slide the panel out to access the wiring
Identifying the correct pins
- The 18 pin connector between the steering column and the car's wiring has the ignition, headlight switch and ground cables
- To find which cable is which, attach a multimeter to ground (part of the accelerator pedal arm can be used as a ground)
- Use the positive test probe to test each of the pins by poking it into the connector from the back where the wires go in (while it is still connected)
- The ground pin will always be 0V
- The ignition pin should be 12V when the key is in the ACC position and 0V when it is in the OFF position
- The headlight switch pin should be 12V when the headlights are turned on and 0V when they are off.
Your car's wiring may differ, so be sure to test the voltages before stripping any wires.
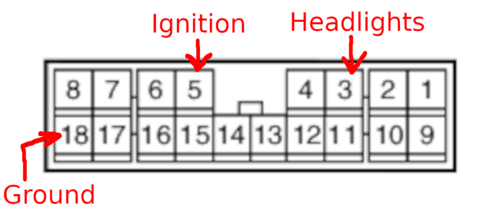
- This diagram shows the pins that were tapped into in the tested car (1999 model).
- This pin diagram is as viewed from the back end (wire end) of the plug (ECU end, not steering column end).
Wire colouration may differ. In the tested car, the wires were as follows:
| Pin | Colouration | Function |
|---|---|---|
| 3 | Headlights | Red/Yellow |
| 5 | Ignition | Yellow/Blue |
| 18 | Ground | Black |
Installing the relay and buzzer
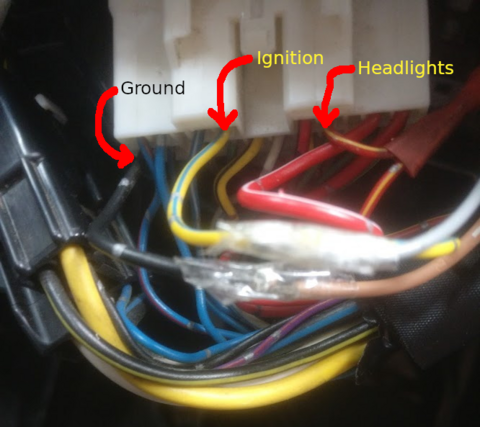
- Disconnect the 18 pin plug coming from the steering column
- Strip each of the 3 wires using a wire stripper (try to keep the wire intact and just strip the outer housing).
- Wrap some new wire around each of the wires coming from the loom and cover the connection with electrical tape.
- Connect the wires and the piezo buzzer to the relay as shown in the diagram.
Re-assembly
- Tuck the relay, piezo and excess wire up inside the steering column (secure with tape, ziptie or your favourite method of DIY fastening)
- Replace the trim panel with the screws removed earlier.
- Test out the ear grating headlight buzzer by turning off the ignition and flicking on the headlights
- Enjoy not waking up to a flat battery
Related forum discussions
The following forum discussions contain useful info regarding these issues:
Page last edited on 13/12/2021 by user Bosanek


