Difference between revisions of "4WD transmission failure diagnostics"
m (Emergency chapter name correction) |
(Moved the solution for transfer box out of sequence from article "4WD transmission system operation" into this article in new "Problem 11") |
||
| (12 intermediate revisions by 2 users not shown) | |||
| Line 5: | Line 5: | ||
| − | + | The purpose of this article is to be a fault finding (troubleshooting) guide when Jimny's 4WD transmission system stops working properly. | |
| − | + | "Improper operation" of the 4WD transmission system, in the context of this article, is anything of the following: | |
| + | * Impossible to engage 4WD-H mode from 2WD-H mode; | ||
| + | * Impossible to disengage 4WD-H mode back into 2WD-H mode; | ||
| + | ** Sub-issue: Vehicle starts in 4WD-H mode as soon as the engine is started and won't disengage into 2WD-H mode; | ||
| + | * Impossible to change from 4WD-H mode into 4WD-L mode or vice versa; | ||
| + | * 4WD-H mode formally engaged, but the front axle receives no torque from the engine; | ||
| − | |||
| − | |||
| − | |||
| − | |||
| − | |||
| − | |||
| + | {{note|In order to properly understand this article, you should first properly understand the operating principles of Jimny's entire 4WD transmission system.<br> That topic is covered in a dedicated wiki article [[4WD transmission system operation|'''"4WD transmission system operation"''']].}} | ||
| − | |||
| − | |||
| − | |||
| − | |||
| + | == General issues and solutions == | ||
| − | |||
| + | There can be only three general points of failure (ordered from most to least common) which can cause Jimny's 4WD system to malfunction: | ||
| + | # Front wheel(s) don't receive torque from the engine despite that the front drive shaft does; | ||
| + | # Transfer case either: | ||
| + | ## Can not start transferring torque to the front drive shaft; | ||
| + | ## Can not stop transferring torque to the front drive shaft; | ||
| + | ## Does not switch high / low range gearing; | ||
| + | # 4WD control computer issues; | ||
| + | #* Depending on the vehicle edition, can manifest as almost any of the above problems or as no 4WD lamps on the instrument panel; | ||
| − | |||
| + | == General notes about transfer box issues == | ||
| − | |||
| + | How the 4WD controller knows the 2WD/4WD operational status of the transfer box: | ||
| + | * There is a small electrical switch on the side of the transfer box. | ||
| + | * The switch is mechanically operated by a ball bearing inside the transfer box. | ||
| + | * The ball bearing puts (and keeps) the switch into closed / shorted position when the transfer box is in 4WD mode (front propeller shaft engaged) and puts (and keeps) the switch into open / disconnected position when the transfer box is in 2WD mode (front propeller shaft disengaged). | ||
| + | * A constant 12 volt output from 4WD controller is fed to this switch along the blue/black striped wire. | ||
| + | ** "Constant" means that 12 V are fed from the 4WD controller as long as the vehicle is running. | ||
| + | * When the switch is closed, this constant 12 V signal is shorted to earth. | ||
| + | * Therefore, the 4WD controller knows if the transfer box is in 2WD or 4WD mode (if the front propeller shaft is disengaged or engaged) simply by monitoring if this 12 V signal is shorted to earth or not. | ||
| + | * When the 4WD controller detects a that this 12 V signal has just been shorted to earth, it then starts operating the vacuum system to lock the free wheeling hub heads on the front wheels. | ||
| − | |||
| − | |||
| − | |||
| − | + | Handy "Get You Going" Tip: | |
| − | + | * If your diagnosis is that the switch has failed, then you can short the blue/black striped wire to the car chassis/body. | |
| − | + | ** Pull the connector under the car apart and short the pins together with a bit of wire. | |
| − | + | * If the switch is working properly, it will now short out the 12 volts and the 4WD controller now has been told to operate the hub heads. | |
| − | |||
| − | |||
| − | |||
| − | |||
| − | |||
| − | |||
| − | |||
| − | |||
| − | |||
| − | * | ||
| − | * | ||
| − | |||
| − | * | ||
| − | |||
| − | == General issues | + | == General notes about vacuum system issues == |
| Line 68: | Line 63: | ||
* This will eliminate the entire vacuum system, and with it all the risks and issues which it imposes. | * This will eliminate the entire vacuum system, and with it all the risks and issues which it imposes. | ||
* That procedure is explained in a dedicated wiki article [[Manual or fixed front wheel hub heads|"'''Manual or fixed front wheel hub heads'''"]]. | * That procedure is explained in a dedicated wiki article [[Manual or fixed front wheel hub heads|"'''Manual or fixed front wheel hub heads'''"]]. | ||
| − | |||
| − | |||
| − | |||
| − | |||
| − | |||
| − | |||
| − | |||
| − | |||
| − | |||
| − | |||
| − | |||
| − | |||
| − | |||
| − | |||
| − | |||
| − | |||
| − | |||
| − | |||
| Line 91: | Line 68: | ||
| − | [[File: | + | [[File:Suzuki Jimny - air locking wheel hub heads - operating principle - A01.png|thumb|left|512px|Overview of locking free wheeling hubs]] |
| − | * The free wheeling hub heads fitted to the Jimny are “sliding collar” designs. | + | * The vacuum operated free wheeling hub heads fitted to the Jimny 3 are “sliding collar” designs. |
* The collar is pulled onto the drive shaft or pushed off from the drive shaft (depending on the need) by the vacuum from the engine. | * The collar is pulled onto the drive shaft or pushed off from the drive shaft (depending on the need) by the vacuum from the engine. | ||
* This highly simplified picture shows the theory. | * This highly simplified picture shows the theory. | ||
* The sliding collar on the picture in in the locked position, as it is slid on the drive shaft, so the drive shaft and the wheel are in a solid connection. | * The sliding collar on the picture in in the locked position, as it is slid on the drive shaft, so the drive shaft and the wheel are in a solid connection. | ||
* When the collar moves to the left, it is out and is not engaged on the drive shaft splines. | * When the collar moves to the left, it is out and is not engaged on the drive shaft splines. | ||
| − | <br clear=all> | + | <br clear="all"> |
| Line 104: | Line 81: | ||
# The vacuum makes the collar slide in the desired direction (depending on through which route the vacuum came), but then is '''NOT''' required in order to hold the collar in position. | # The vacuum makes the collar slide in the desired direction (depending on through which route the vacuum came), but then is '''NOT''' required in order to hold the collar in position. | ||
# Once the collar has slid in either direction, it will stay there through the use of magnets and friction. | # Once the collar has slid in either direction, it will stay there through the use of magnets and friction. | ||
| − | # The vacuum is used to make it slide both to lock and unlock by changing the route of the vacuum (valves and switches control the route) | + | # The vacuum is used only to make it slide both to lock and unlock by changing the route of the vacuum (valves and switches control the route). |
| + | # Removing the vacuum tube from a locked hub assembly will not unlock its hub head. | ||
| Line 114: | Line 92: | ||
| − | + | [[File:Vacuum hubs - checking and testing guide - figure 01.png|thumb|left|640px|Location of the vacuum system]] | |
| − | |||
| − | |||
| − | |||
| − | |||
| − | |||
| − | |||
| − | |||
| − | |||
| − | |||
| − | |||
| − | [[File: | ||
* Under the bonnet are two solenoids that Suzuki call VSV1 and VSV2. | * Under the bonnet are two solenoids that Suzuki call VSV1 and VSV2. | ||
* The picture shows where the vacuum system is, it’s on the driver’s side at the rear of the engine compartment, under the battery mount (UK cars). | * The picture shows where the vacuum system is, it’s on the driver’s side at the rear of the engine compartment, under the battery mount (UK cars). | ||
| − | <br clear=all> | + | <br clear="all"> |
| − | [[File: | + | [[File:Vacuum hubs - checking and testing guide - figure 02.png|thumb|left|640px|Vacuum check valve]] |
* The vacuum for the system is taken from the intake manifold. | * The vacuum for the system is taken from the intake manifold. | ||
* If first goes through a check valve, whose purpose is to isolate the faults in the vacuum hub system from affecting the engine intake. | * If first goes through a check valve, whose purpose is to isolate the faults in the vacuum hub system from affecting the engine intake. | ||
* The picture shows the valve and its pipe from the manifold. | * The picture shows the valve and its pipe from the manifold. | ||
| − | <br clear=all> | + | <br clear="all"> |
| − | [[File: | + | [[File:Vacuum hubs - checking and testing guide - figure 03.png|thumb|left|640px|Valve block]] |
* The vacuum is next fed from the check valve down to the solenoid block containing VSV1 and VSV2 valves. | * The vacuum is next fed from the check valve down to the solenoid block containing VSV1 and VSV2 valves. | ||
* In the picture, the green arrow shows the check valve (see previous picture), the yellow arrow points to the valve block (with pipes marked 1 and 2 exiting one end) and the red arrow points to the pipe leading to the vacuum tank. | * In the picture, the green arrow shows the check valve (see previous picture), the yellow arrow points to the valve block (with pipes marked 1 and 2 exiting one end) and the red arrow points to the pipe leading to the vacuum tank. | ||
| − | <br clear=all> | + | <br clear="all"> |
| − | [[File: | + | [[File:Vacuum hubs - checking and testing guide - figure 04.png|thumb|left|640px|Vacuum Tank]] |
* The vacuum tank is located under the front wing and stores the vacuum, so that the free wheeling hub heads can be operated without the engine running. | * The vacuum tank is located under the front wing and stores the vacuum, so that the free wheeling hub heads can be operated without the engine running. | ||
| − | <br clear=all> | + | <br clear="all"> |
| Line 155: | Line 122: | ||
| − | [[File: | + | [[File:Vacuum hubs - checking and testing guide - figure 05.png|thumb|left|640px|Vacuum tubes]] |
* Having got the signal, the 4WD controller sends a signal to VSV2, its the top valve in the valve block with the pipe marked “2” coming out of it (note: yours will not have the handy labels I have added to mine!). | * Having got the signal, the 4WD controller sends a signal to VSV2, its the top valve in the valve block with the pipe marked “2” coming out of it (note: yours will not have the handy labels I have added to mine!). | ||
| Line 167: | Line 134: | ||
* This is connected in the vacuum pipe work and operates when it detects the correct level of vacuum. | * This is connected in the vacuum pipe work and operates when it detects the correct level of vacuum. | ||
* Therefore, after commanding VSV2 to open, the controller monitors this switch, which is normally shorting the grey lead to earth checking for it to open (ie. no longer short out the grey wire). | * Therefore, after commanding VSV2 to open, the controller monitors this switch, which is normally shorting the grey lead to earth checking for it to open (ie. no longer short out the grey wire). | ||
| − | <br clear=all> | + | <br clear="all"> |
| − | [[File: | + | [[File:Vacuum hubs - checking and testing guide - figure 06.png|thumb|left|640px|Air filter]] |
* If the vacuum detection switch does not detect enough vacuum, then the controller flashes the 4WD light on the dashboard. | * If the vacuum detection switch does not detect enough vacuum, then the controller flashes the 4WD light on the dashboard. | ||
* The vacuum monitoring switch has a small “air filter” on the side (shown with the yellow arrow below). | * The vacuum monitoring switch has a small “air filter” on the side (shown with the yellow arrow below). | ||
* This filter can get clogged with dirt and can stop the system from working – it simply pulls off and washes clean! | * This filter can get clogged with dirt and can stop the system from working – it simply pulls off and washes clean! | ||
| − | <br clear=all> | + | * If you are considering fitting manual hubs then simply short out the two wires on this detection switch to fool the system into thinking it has successfully selected 4WD. |
| + | <br clear="all"> | ||
| Line 183: | Line 151: | ||
| − | [[File: | + | [[File:Vacuum hubs - checking and testing guide - figure 07.png|thumb|left|376px|Lock tube (with brake caliper removed]] |
* Down at the wheel hub assemblies, the "lock" and "unlock" tubes come either along the trailing (radius) arms (early models) or along the front axle (later models). | * Down at the wheel hub assemblies, the "lock" and "unlock" tubes come either along the trailing (radius) arms (early models) or along the front axle (later models). | ||
* The “lock” tube enters the top of the wheel hub assembly, hidden under the brake caliper. The "unlock" tube enters the side of the wheel hub assembly. | * The “lock” tube enters the top of the wheel hub assembly, hidden under the brake caliper. The "unlock" tube enters the side of the wheel hub assembly. | ||
| − | <br clear=all> | + | <br clear="all"> |
| − | [[File: | + | [[File:Vacuum hubs - checking and testing guide - figure 08.png|thumb|left|376px|Both lock and unlock tubes (black braided tubes) - the unlock tube is the lower tube that comes down to the front of the wheel hub assembly.]] |
| − | <br clear=all> | + | <br clear="all"> |
| − | [[File: | + | [[File:Vacuum_hubs_-_checking_and_testing_guide_-_figure_05.png|thumb|left|640px|Vacuum tubes again]] |
* To some extent the unlock process is the reverse process. | * To some extent the unlock process is the reverse process. | ||
| Line 203: | Line 171: | ||
* It is handy to note that the “unlock” tube is the one marked “1” in the picture. | * It is handy to note that the “unlock” tube is the one marked “1” in the picture. | ||
| − | <br clear=all> | + | <br clear="all"> |
| Line 211: | Line 179: | ||
| − | == | + | == 4WD fault finding overview == |
| Line 276: | Line 244: | ||
:Vacuum pipes blocked | :Vacuum pipes blocked | ||
:Hub head stuck/clogged or worn | :Hub head stuck/clogged or worn | ||
| + | |- | ||
| + | | | ||
| + | :Transfer box is in 4WD-H. Then 2WD-H is selected. | ||
| + | :4WD lamp flashes rapidly (5 times per second). | ||
| + | :Transmission mode change fails and transfer box remains in 4WD mode. | ||
| + | | | ||
| + | :10 | ||
| + | | | ||
| + | :Actuator or sensor in transfer box has failed. | ||
| + | |- | ||
| + | | | ||
| + | :Transfer box stops transmitting torque to both axles (to all wheels). | ||
| + | :It is not known if this indicated on the instrument panel. | ||
| + | | | ||
| + | :11 | ||
| + | | | ||
| + | :Transfer box gets out of sequence. | ||
|} | |} | ||
| − | |||
== Checking the 4WD transmission system == | == Checking the 4WD transmission system == | ||
| − | === | + | === Situation assessment === |
| − | + | First and foremost, it is important to establish whether the system is really working OK or what does not work: | |
# Pull the handbrake on, put the gearbox in neutral, start the engine. | # Pull the handbrake on, put the gearbox in neutral, start the engine. | ||
# Jack up ONE front wheel, make sure all the other wheels are on the ground. | # Jack up ONE front wheel, make sure all the other wheels are on the ground. | ||
| Line 302: | Line 286: | ||
=== Problem X - Sporadic issues === | === Problem X - Sporadic issues === | ||
| + | |||
* Beware that sometimes minor air leaks, mechanical "quirks" or electrical "quirks" might exist in the vacuum system, which exhibit only in certain conditions (load, temperature, humidity, vibrations, angle, etc.). | * Beware that sometimes minor air leaks, mechanical "quirks" or electrical "quirks" might exist in the vacuum system, which exhibit only in certain conditions (load, temperature, humidity, vibrations, angle, etc.). | ||
| + | ** Even the wiring for the transfer box can exhibit sporadic issues. | ||
* This is the worst situation, when a reliable diagnosis is the most difficult to perform. | * This is the worst situation, when a reliable diagnosis is the most difficult to perform. | ||
* That's why pneumatic systems are notorious. | * That's why pneumatic systems are notorious. | ||
* In this case, (dis)engagement of the front wheel hub heads can work sporadically - sometimes it works fine, sometimes it does not. | * In this case, (dis)engagement of the front wheel hub heads can work sporadically - sometimes it works fine, sometimes it does not. | ||
| − | * Therefore, the above | + | * Therefore, the above situation assessment procedure might complete successfully if the "conditions for failure" (temperature, humidity, load, etc.) are not achieved (read: your stars aren't yet aligned). |
* If your vacuum system fails only sporadically, then either drive around and wait until it fails in the middle of a trip (and then immediately perform this check while it's still malfunctioning), or just give up and change to manual free wheeling hub heads. | * If your vacuum system fails only sporadically, then either drive around and wait until it fails in the middle of a trip (and then immediately perform this check while it's still malfunctioning), or just give up and change to manual free wheeling hub heads. | ||
* The other solution is to sequentially perform all the below mentioned checks, starting from the simplest/cheapest one. | * The other solution is to sequentially perform all the below mentioned checks, starting from the simplest/cheapest one. | ||
| Line 341: | Line 327: | ||
* The fuse box changes on different versions of the car, your situation might be specific. | * The fuse box changes on different versions of the car, your situation might be specific. | ||
| − | <br clear=all> | + | <br clear="all"> |
| − | [[File: | + | [[File:Suzuki Jimny - fuse box (type 1) - A01.png|thumb|left|208px|Type 1/2 Fusebox – 4WD is FUSE 21]] |
| − | <br clear=all> | + | <br clear="all"> |
| − | <br clear=all> | + | <br clear="all"> |
| − | [[File: | + | [[File:Suzuki Jimny - fuse box (type 2) - A01.png|thumb|left|184px|Type 3 Fusebox – 4WD is FUSE 38]] |
| − | <br clear=all> | + | <br clear="all"> |
| Line 424: | Line 410: | ||
| − | == | + | === Problem 10 - Actuator and position sensor in the transfer box === |
| − | + | * The transfer box can get "stuck" in 4WD mode if one of its internal sensors fails or if the actuator in the transfer box fails. | |
| + | * The 4WD controller signals this by flashing the green 4WD lamp rapidly (5 times per second). | ||
| − | If the | + | Diagnostic procedure: |
| + | # Check the wires on the outside of the transfer box are not damaged. | ||
| + | # Unplug the connector and thoroughly clean the contacts. | ||
| + | # Hit/bang the actuator on the outside of the transfer box. (yes - really!) | ||
| + | # Unbolt the actuator, inspect it and manually operate it checking that it moves. | ||
| + | # If all these do not cure it, then the typical cheapest way is to replace the transfer box, as its usually cheaper than replacing the faulty parts. | ||
| − | + | === Problem 11 - Transfer box out of sequence === | |
| − | |||
| − | |||
| − | |||
| − | + | * The transfer box can (rarely) get out of sequence. | |
| + | * Little is currently known about this issue, and some details on resetting it are also desired to be written by someone! | ||
| − | + | == Emergency options if the 4WD system fails == | |
| − | |||
| − | |||
| + | * Read the wiki article [[4WD transmission failure - emergency measures|"'''4WD transmission failure - emergency measures'''"]] for the full guidelines. | ||
| − | |||
| − | |||
| + | == Useful forum discussions == | ||
| − | |||
| + | The following forum discussions contain some useful info: | ||
| + | * [http://www.bigjimny.com/index.php/forum/7-jimny-technical/65350-converting-hubs-on-a-push-button-2005 Discussion 1] | ||
| − | + | {{Edited}} | |
| − | |||
| − | |||
| − | |||
| − | |||
| − | |||
| − | |||
| − | |||
| − | |||
| − | |||
| − | |||
| − | |||
| − | |||
| − | |||
| − | |||
| − | |||
| − | |||
| − | |||
| − | |||
| − | |||
| − | |||
| − | |||
| − | |||
| − | |||
| − | |||
| − | |||
| − | |||
| − | |||
| − | |||
| − | |||
| − | |||
| − | |||
| − | |||
| − | |||
| − | |||
| − | |||
| − | |||
| − | |||
| − | |||
| − | |||
| − | |||
| − | |||
| − | |||
| − | |||
| − | |||
| − | |||
| − | |||
| − | |||
| − | |||
| − | |||
| − | |||
| − | |||
| − | |||
| − | |||
| − | |||
| − | |||
| − | |||
| − | |||
| − | |||
| − | |||
| − | |||
| − | |||
| − | |||
| − | |||
| − | |||
| − | |||
| − | |||
| − | |||
| − | |||
| − | |||
| − | |||
| − | |||
| − | |||
| − | |||
| − | |||
| − | |||
| − | |||
| − | |||
| − | |||
| − | |||
| − | |||
| − | |||
| − | |||
| − | |||
| − | |||
| − | |||
| − | |||
| − | |||
| − | |||
| − | |||
| − | |||
| − | |||
| − | |||
| − | |||
| − | |||
| − | |||
| − | |||
| − | |||
| − | |||
| − | |||
| − | |||
| − | |||
| − | |||
| − | |||
| − | |||
| − | |||
| − | |||
| − | |||
| − | |||
| − | |||
| − | |||
| − | |||
| − | |||
| − | |||
| − | |||
| − | |||
| − | |||
| − | |||
| − | |||
| − | |||
| − | |||
| − | |||
| − | |||
| − | |||
| − | |||
| − | |||
| − | |||
| − | |||
| − | |||
| − | |||
| − | |||
| − | |||
| − | |||
| − | |||
| − | |||
| − | |||
| − | |||
| − | |||
| − | |||
| − | |||
| − | |||
| − | |||
| − | |||
| − | + | [[Category:Common_Problems - gen3]] | |
| − | + | [[Category:Howto - gen3]] | |
| − | + | [[Category:Drivechain - gen3]] | |
| − | |||
| − | |||
| − | |||
| − | |||
| − | |||
| − | |||
| − | |||
| − | |||
| − | |||
| − | |||
| − | |||
| − | |||
| − | |||
| − | |||
| − | |||
| − | |||
| − | |||
| − | |||
| − | |||
| − | |||
| − | |||
| − | |||
| − | |||
| − | |||
| − | |||
| − | |||
| − | |||
| − | [[Category:Common_Problems]][[Category:Howto]][[Category:Drivechain]] | ||
Latest revision as of 09:09, 15 March 2021
![]() The content of any article might be expanded / improved in the future - revisit it sometimes.
The content of any article might be expanded / improved in the future - revisit it sometimes.
![]() Seen a mistake? Know something that isn't written? Edit and change this article yourself!
Seen a mistake? Know something that isn't written? Edit and change this article yourself!
![]() Some images in the article (if present) can be enlarged by clicking on them.
Some images in the article (if present) can be enlarged by clicking on them.
Contents
- 1 Introduction
- 2 General issues and solutions
- 3 General notes about transfer box issues
- 4 General notes about vacuum system issues
- 5 4WD fault finding overview
- 6 Checking the 4WD transmission system
- 6.1 Situation assessment
- 6.2 Problem X - Sporadic issues
- 6.3 Problem 1 – 4WD switch has failed
- 6.4 Problem 2 – 4WD switch wiring has broken
- 6.5 Problem 3 – Electric fuse has burned out
- 6.6 Problem 4 – 4WD controller has failed
- 6.7 Problem 5 - Vacuum pipes blocked
- 6.8 Problem 6 - Vacuum/air leaks from the system
- 6.9 Problem 7 – A solenoid has failed
- 6.10 Problem 8 – Pressure switch failure
- 6.11 Problem 9 - Hub head clogged or worn
- 6.12 Problem 10 - Actuator and position sensor in the transfer box
- 6.13 Problem 11 - Transfer box out of sequence
- 7 Emergency options if the 4WD system fails
- 8 Useful forum discussions
Introduction
The purpose of this article is to be a fault finding (troubleshooting) guide when Jimny's 4WD transmission system stops working properly.
"Improper operation" of the 4WD transmission system, in the context of this article, is anything of the following:
- Impossible to engage 4WD-H mode from 2WD-H mode;
- Impossible to disengage 4WD-H mode back into 2WD-H mode;
- Sub-issue: Vehicle starts in 4WD-H mode as soon as the engine is started and won't disengage into 2WD-H mode;
- Impossible to change from 4WD-H mode into 4WD-L mode or vice versa;
- 4WD-H mode formally engaged, but the front axle receives no torque from the engine;
![]() In order to properly understand this article, you should first properly understand the operating principles of Jimny's entire 4WD transmission system.
In order to properly understand this article, you should first properly understand the operating principles of Jimny's entire 4WD transmission system.
That topic is covered in a dedicated wiki article "4WD transmission system operation".
General issues and solutions
There can be only three general points of failure (ordered from most to least common) which can cause Jimny's 4WD system to malfunction:
- Front wheel(s) don't receive torque from the engine despite that the front drive shaft does;
- Transfer case either:
- Can not start transferring torque to the front drive shaft;
- Can not stop transferring torque to the front drive shaft;
- Does not switch high / low range gearing;
- 4WD control computer issues;
- Depending on the vehicle edition, can manifest as almost any of the above problems or as no 4WD lamps on the instrument panel;
General notes about transfer box issues
How the 4WD controller knows the 2WD/4WD operational status of the transfer box:
- There is a small electrical switch on the side of the transfer box.
- The switch is mechanically operated by a ball bearing inside the transfer box.
- The ball bearing puts (and keeps) the switch into closed / shorted position when the transfer box is in 4WD mode (front propeller shaft engaged) and puts (and keeps) the switch into open / disconnected position when the transfer box is in 2WD mode (front propeller shaft disengaged).
- A constant 12 volt output from 4WD controller is fed to this switch along the blue/black striped wire.
- "Constant" means that 12 V are fed from the 4WD controller as long as the vehicle is running.
- When the switch is closed, this constant 12 V signal is shorted to earth.
- Therefore, the 4WD controller knows if the transfer box is in 2WD or 4WD mode (if the front propeller shaft is disengaged or engaged) simply by monitoring if this 12 V signal is shorted to earth or not.
- When the 4WD controller detects a that this 12 V signal has just been shorted to earth, it then starts operating the vacuum system to lock the free wheeling hub heads on the front wheels.
Handy "Get You Going" Tip:
- If your diagnosis is that the switch has failed, then you can short the blue/black striped wire to the car chassis/body.
- Pull the connector under the car apart and short the pins together with a bit of wire.
- If the switch is working properly, it will now short out the 12 volts and the 4WD controller now has been told to operate the hub heads.
General notes about vacuum system issues
- Most Jimnys (especially those which are regularly used in all-terrain duty) will, inevitably, have problems with the vacuum system for the free wheeling front wheel hub heads.
- Diagnosis and repair, depending on the issue, can range from a quick detection and a simple/cheap fix, to a thorough investigation with expensive repairs.
- The purpose of this article is to explain how Jimny's vacuum system works, and to assist you in the diagnosis of its faults.
- Eventually, you may consider changing the vacuum operated free wheeling hub heads to manual or even fixed ones (like in Samurais and other classic 4WD vehicles).
- This will eliminate the entire vacuum system, and with it all the risks and issues which it imposes.
- That procedure is explained in a dedicated wiki article "Manual or fixed front wheel hub heads".
The construction of original vacuum free wheeling hub heads
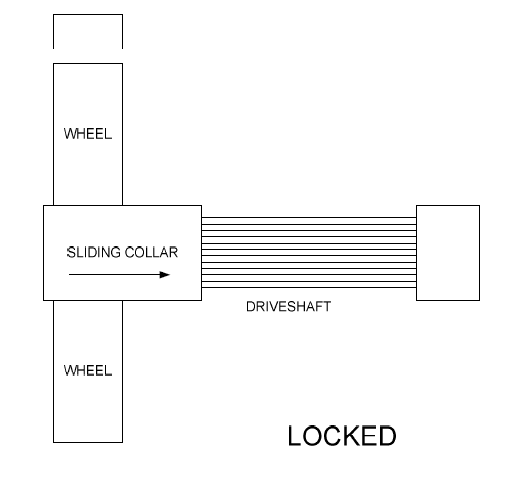
- The vacuum operated free wheeling hub heads fitted to the Jimny 3 are “sliding collar” designs.
- The collar is pulled onto the drive shaft or pushed off from the drive shaft (depending on the need) by the vacuum from the engine.
- This highly simplified picture shows the theory.
- The sliding collar on the picture in in the locked position, as it is slid on the drive shaft, so the drive shaft and the wheel are in a solid connection.
- When the collar moves to the left, it is out and is not engaged on the drive shaft splines.
As stated, the diagram is highly simplified and there are a few key points to remember:
- The vacuum makes the collar slide in the desired direction (depending on through which route the vacuum came), but then is NOT required in order to hold the collar in position.
- Once the collar has slid in either direction, it will stay there through the use of magnets and friction.
- The vacuum is used only to make it slide both to lock and unlock by changing the route of the vacuum (valves and switches control the route).
- Removing the vacuum tube from a locked hub assembly will not unlock its hub head.
How the vacuum system works
![]() This guide was written based on a RHD (right hand drive) petrol Jimny configuration.
This guide was written based on a RHD (right hand drive) petrol Jimny configuration.
The situation in LHD petrol Jimnys might differ in the positioning of some elements.
![]() The vacuum system in diesel (DDiS) Jimnys differs significantly in some aspects.
The vacuum system in diesel (DDiS) Jimnys differs significantly in some aspects.
Read the wiki article "Diesel (DDiS) Jimny specifics" for more information.
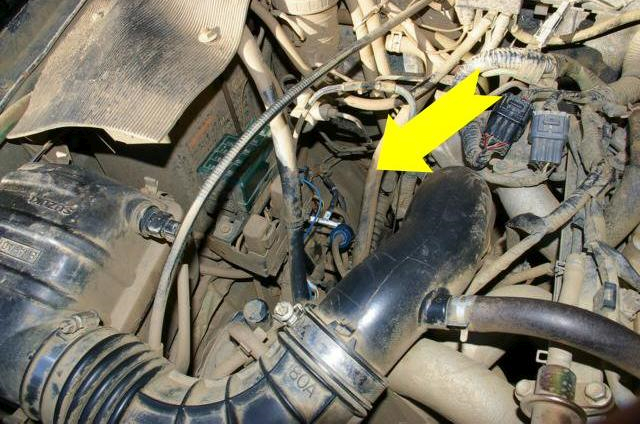
- Under the bonnet are two solenoids that Suzuki call VSV1 and VSV2.
- The picture shows where the vacuum system is, it’s on the driver’s side at the rear of the engine compartment, under the battery mount (UK cars).
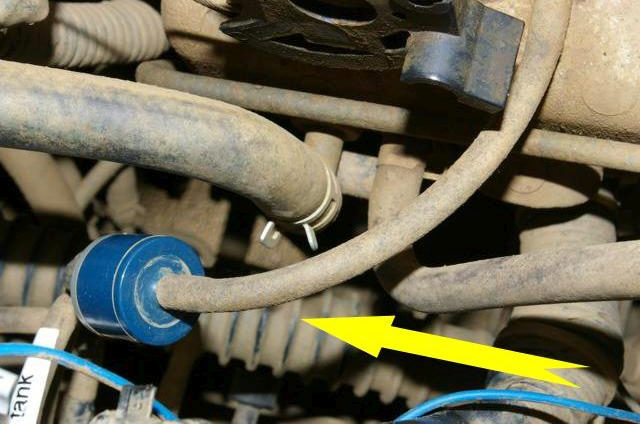
- The vacuum for the system is taken from the intake manifold.
- If first goes through a check valve, whose purpose is to isolate the faults in the vacuum hub system from affecting the engine intake.
- The picture shows the valve and its pipe from the manifold.
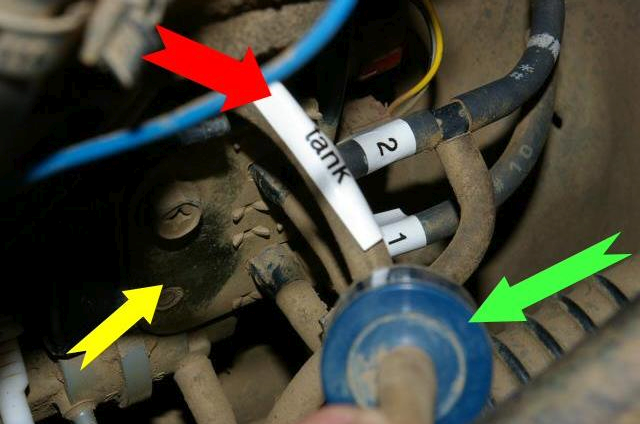
- The vacuum is next fed from the check valve down to the solenoid block containing VSV1 and VSV2 valves.
- In the picture, the green arrow shows the check valve (see previous picture), the yellow arrow points to the valve block (with pipes marked 1 and 2 exiting one end) and the red arrow points to the pipe leading to the vacuum tank.
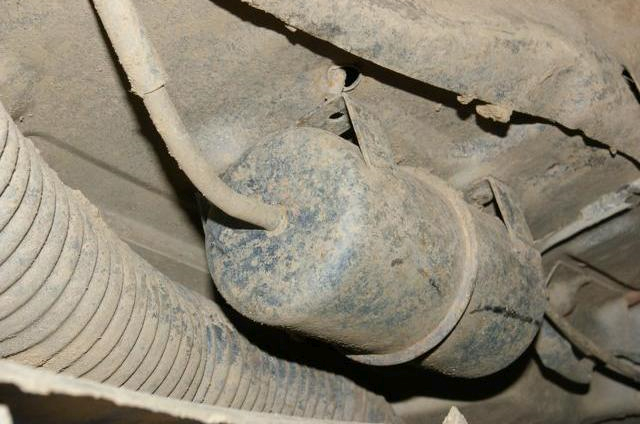
- The vacuum tank is located under the front wing and stores the vacuum, so that the free wheeling hub heads can be operated without the engine running.
So back to how it operates:
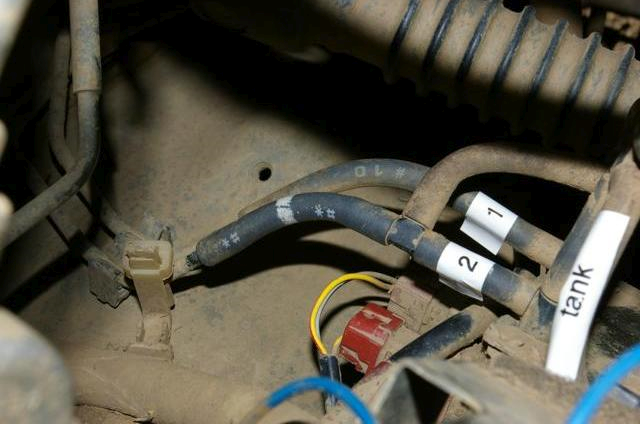
- Having got the signal, the 4WD controller sends a signal to VSV2, its the top valve in the valve block with the pipe marked “2” coming out of it (note: yours will not have the handy labels I have added to mine!).
- The second solenoid (VSV2) is the solenoid that locks the wheel hub heads.
- The controller sends a pulse of 12 volts for 5 seconds only, opening the valve for 5 seconds.
- This "sends the vacuum" down the “lock” tubes to the wheel hub heads.
- It is handy to note that the “lock” tube is the one marked “2” in this picture.
- The 4WD controller leaves nothing to chance, and there is another switch in the circuit, the vacuum monitoring switch.
- This is connected in the vacuum pipe work and operates when it detects the correct level of vacuum.
- Therefore, after commanding VSV2 to open, the controller monitors this switch, which is normally shorting the grey lead to earth checking for it to open (ie. no longer short out the grey wire).
- If the vacuum detection switch does not detect enough vacuum, then the controller flashes the 4WD light on the dashboard.
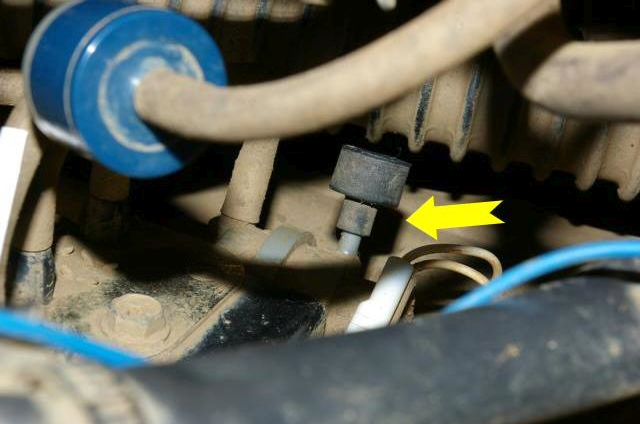
- The vacuum monitoring switch has a small “air filter” on the side (shown with the yellow arrow below).
- This filter can get clogged with dirt and can stop the system from working – it simply pulls off and washes clean!
- If you are considering fitting manual hubs then simply short out the two wires on this detection switch to fool the system into thinking it has successfully selected 4WD.
- Assuming everything is working correctly, the vacuum is transferred down the “lock” tubes and both hub head sliders slip nicely into the lock position.
- After 5 seconds of vacuum application, VSV2 is released, removing the vacuum from the “lock” tubes.
- The vacuum is “released” through a small plastic filter located on the side of the solenoid block (see above).
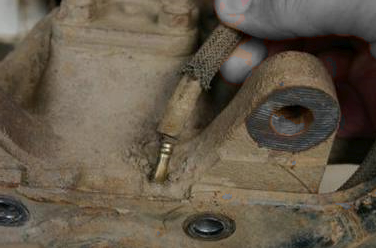
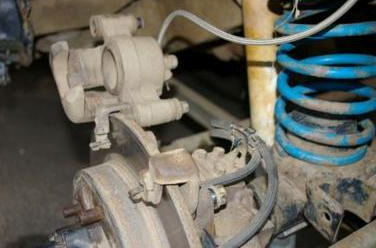
- Down at the wheel hub assemblies, the "lock" and "unlock" tubes come either along the trailing (radius) arms (early models) or along the front axle (later models).
- The “lock” tube enters the top of the wheel hub assembly, hidden under the brake caliper. The "unlock" tube enters the side of the wheel hub assembly.
- To some extent the unlock process is the reverse process.
- Once the 4WD signal from the transfer box has disappeared, the 4WD controller sends a signal to VSV1.
- It's the lower valve in the valve block with the pipe marked “1” coming out of it.
- The controller sends a pulse of 12 volts for 10 seconds only, opening the valve for 10 seconds.
- This sends the vacuum down the “unlock” tubes to the hub heads.
- It is handy to note that the “unlock” tube is the one marked “1” in the picture.
- That is the operation of the system "in a nutshell".
- In simple terms, a valve bank sends the vacuum down one pipe or the other for a short duration of time, to pull the slider in the free wheeling hub heads in either direction as required.
- Sadly this process does not always work, so the usual issue is that you need to go through a fault finding process.
4WD fault finding overview
- The table below shows the typical faults in Jimny's 4WD transmission system.
- Use the numeric references in the table e.g. "Problem 4" to reference the specific checks in the following chapters.
| Status | Problem # | Problem description |
|---|---|---|
|
|
|
|
|
|
|
|
|
|
|
|
|
|
|
|
|
|
Checking the 4WD transmission system
Situation assessment
First and foremost, it is important to establish whether the system is really working OK or what does not work:
- Pull the handbrake on, put the gearbox in neutral, start the engine.
- Jack up ONE front wheel, make sure all the other wheels are on the ground.
- Put the transfer box in 4WD, and immediately listen for a (more or less) loud click from that wheel's hub head.
- Wait for at least 5 seconds (or even 10), and then try to turn that wheel by hand.
- The wheel should be locked - impossible to turn. If the wheel turns, then it has not locked.
- If it has locked, then move the transfer box out of 4WD, listen for a (more or less) loud click from that wheel's hub head.
- Wait for at least 5 seconds (or even 10), and then try to turn that wheel by hand.
- If the wheel turns, then it has unlocked properly.
- Repeat this entire procedure for other front wheel.
- The above test gives you a good idea what is and what isn’t working in the system.
- If all this works with both front wheels, your vacuum system is probably working fine.
Problem X - Sporadic issues
- Beware that sometimes minor air leaks, mechanical "quirks" or electrical "quirks" might exist in the vacuum system, which exhibit only in certain conditions (load, temperature, humidity, vibrations, angle, etc.).
- Even the wiring for the transfer box can exhibit sporadic issues.
- This is the worst situation, when a reliable diagnosis is the most difficult to perform.
- That's why pneumatic systems are notorious.
- In this case, (dis)engagement of the front wheel hub heads can work sporadically - sometimes it works fine, sometimes it does not.
- Therefore, the above situation assessment procedure might complete successfully if the "conditions for failure" (temperature, humidity, load, etc.) are not achieved (read: your stars aren't yet aligned).
- If your vacuum system fails only sporadically, then either drive around and wait until it fails in the middle of a trip (and then immediately perform this check while it's still malfunctioning), or just give up and change to manual free wheeling hub heads.
- The other solution is to sequentially perform all the below mentioned checks, starting from the simplest/cheapest one.
Problem 1 – 4WD switch has failed
- You need to get under the car for this.
- On the back of the transfer box is the 4WD switch.
- It has a blue/black and a black wire going to it, via a plastic plug.
- The plastic plug pulls apart by lifting the small tag with your fingernail.
- Use a piece of wire to short out the connectors on the end of the wire/plug that disappears up into the car.
- If this makes the 4WD system light come on, then the 4WD switch on the transfer is suspect.
Problem 2 – 4WD switch wiring has broken
- You need to get under the car for this.
- On the back of the transfer box is the 4WD switch.
- It has a blue/black and a black wire going to it, via a plastic plug.
- The plastic plug pulls apart by lifting the small tag with your fingernail.
- Use a voltmeter or a 12 volt bulb mounted on some wire.
- Measure between the blue/black wire and ground.
- If the voltmeter doesn’t show 12 V, then a wire is broken or the 4WD controller has failed.
Problem 3 – Electric fuse has burned out
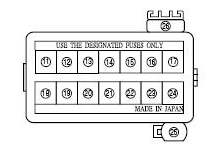
- The fuse is located in the fuse box under the driver's side of the dashboard.
- The fuse box changes on different versions of the car, your situation might be specific.
Problem 4 – 4WD controller has failed
- The controller is hidden right up under the dashboard on the top right hand side.
- You have to pull the fuse wiring to one side and squint up inside the dash.
- Basically, if this is the point of failure, and you have a lever operated 4WD transmission system, you should probably consider fitting manual free wheeling hubs, due to the typical 4WD controller replacement cost.
- On the other hand, if you have a push-button operated 4WD transmission system, you will have to repair or replace the 4WD controller, no matter the cost.
- However, if you have checked the fuses and they are OK, and you have a voltmeter, then it may be worth measuring some voltage around the controller.
- If you can prise the connector (E74) from the controller and have a voltmeter, you should be able to read the following voltages (with the ignition ON).
- Only do this with the connector disconnected!
- 12 volts (from solenoid – VSV1 – If you short this to earth the solenoid will operate)
- 12 volts (from solenoid – VSV2 – If you short this to earth the solenoid will operate)
- 12 volts (from dash bulb – If you short this to earth the dash bulb will come on)
- Air conditioning?
- 0 volts (earth)
- Vacuum switch – Open circuit or earth depending on Vacuum switch
- 4WD switch – Open circuit or earth depending on 4WD switch
- Air conditioning??
- Tachometer??
- 12 volts (from fuse)
Problem 5 - Vacuum pipes blocked
- See solutions for the next problem.
Problem 6 - Vacuum/air leaks from the system
- There is no short way around these problems, you need to inspect the system closely and thoroughly.
- First take a look at the pipework around the solenoids, it is quite common for the plastic connectors/tee pieces to fracture at the joints.
- Check the entire pipework for split hoses or cracked hoses.
- Perhaps a hose is pulled off of the wheel hub assembly behind the wheels.
- The grease seal on the wheel bearing can wear out, allowing ingress of mud, water, dirt etc (and also consequently an air/vacuum leak), all of which prevent the vacuum being applied to the hub head collar.
- There are other elements in the wheel hub assembly which might cause an air blockage or air leak if they are worn or greased/installed/seated improperly (for example: wheel bearing locking nut), so thorough checking and care when working with all those parts is required.
Problem 7 – A solenoid has failed
- The solenoids have power applied when the ignition is ON.
- Pull the grey wire off each solenoid and short the pin on the solenoid to the ground.
- The solenoid should work and you should be able to feel vacuum if you pull of the vacuum tube and put your finger over the pipe connector on the solenoid.
Problem 8 – Pressure switch failure
- First of all – check if the little foam filter on the end of the pressure switch is clean.
- The vacuum switch should be “open circuit” when nothing is happening and goes to “short circuit” when the pressure is correct, BUT remember that the system only pulses the vacuum for 10 seconds!
- If you have the system powered up and functioning correctly with all connectors in place, then the “short circuit” will appear as a 0 volt pulse for about 10 seconds otherwise 12 volts will be across the switch.
Problem 9 - Hub head clogged or worn
- It is fairly simple to demount a free wheeling hub head from the wheel hub assembly and check if it is clogged or worn.
- Just make sure that you mark the exact position in which the hub head was mounted and to mount it in the same position later.
- This principle minimizes the chances of improper seating, therefore minimizing the chances of air leaks.
- If the inside of the hub head is filled with grit or dirty grease (or if it has an excessive amount of grease), its operation can be hindered. Clean it and regrease it.
- Do NOT over grease the inside of the free wheeling hub head!
- Excessive amount of grease can hinder the operation of the sliding collar, or even block the passage of air/vacuum.
- If the teeth on the sliding collar or on the main hub head casing are excessively worn, then you might need a replacement hub head.
- They should be obtainable from vehicle junkyards (or from other Jimny owners who switched over to manual hub heads) for a reasonable price.
Problem 10 - Actuator and position sensor in the transfer box
- The transfer box can get "stuck" in 4WD mode if one of its internal sensors fails or if the actuator in the transfer box fails.
- The 4WD controller signals this by flashing the green 4WD lamp rapidly (5 times per second).
Diagnostic procedure:
- Check the wires on the outside of the transfer box are not damaged.
- Unplug the connector and thoroughly clean the contacts.
- Hit/bang the actuator on the outside of the transfer box. (yes - really!)
- Unbolt the actuator, inspect it and manually operate it checking that it moves.
- If all these do not cure it, then the typical cheapest way is to replace the transfer box, as its usually cheaper than replacing the faulty parts.
Problem 11 - Transfer box out of sequence
- The transfer box can (rarely) get out of sequence.
- Little is currently known about this issue, and some details on resetting it are also desired to be written by someone!
Emergency options if the 4WD system fails
- Read the wiki article "4WD transmission failure - emergency measures" for the full guidelines.
Useful forum discussions
The following forum discussions contain some useful info:
Page last edited on 15/03/2021 by user Bosanek
