Difference between revisions of "Driving lamps (additional)"
(New chapter on lamps on bull bars) |
m (Some cleanup) |
||
| (7 intermediate revisions by the same user not shown) | |||
| Line 4: | Line 4: | ||
== Introduction == | == Introduction == | ||
| − | + | {{Gen3|}}{{Gen4|}} | |
Installing some additional driving lamps (either for forward or reverse driving) is on most people's wish list. | Installing some additional driving lamps (either for forward or reverse driving) is on most people's wish list. | ||
| Line 16: | Line 16: | ||
== Lamps mounted on the roof == | == Lamps mounted on the roof == | ||
| + | {{Gen3|}}{{Gen4|}} | ||
| + | Since most Jimnys 3 have factory longitudinal roof rails, the best way to mount the lamps on the roof is to attach any universal transverse roof rail(s) onto the longitudinal roof rails and then mount the lamps on transverse roof rail(s). | ||
| − | Since | + | Since Jimnys 4 do not have longitudinal roof rails, they require the use of purpose-built transverse roof rails (their feet must be made especially for Jimny 4) and then mount the lamps onto those rails. |
| − | + | In any case, a DIY solution is required to install the wiring from the engine bay or from the passenger cabin all the way up to the roof, as neither Jimny generation has a factory preparation for any sort of wiring on the roof. | |
| Line 41: | Line 43: | ||
== Lamps mounted on or near the bumpers == | == Lamps mounted on or near the bumpers == | ||
| + | {{Gen3|}}{{Gen4|}} | ||
| + | If you want to mount the driving lamps on/near the bumpers, you have a problem that both Jimny 3 and 4 have modern soft plastic bumpers. They are inadequate to be mounting holders for the lamps, because they are not sturdy enough. | ||
| − | |||
| + | === Rear bumper === | ||
| − | |||
| + | In case of the rear bumper on Jimny 3, (very small) driving lamps can be installed only in the bumper itself (by cutting a hole in it somewhere near the rear lamps). Mounting anything on the bumper is out of the question, unless you don't plan to open the rear door ever again. | ||
| − | + | ''Info needed in case of the rear bumper on Jimny 4 ...'' | |
| Line 54: | Line 58: | ||
| − | In case of the front bumper, it is not advisable to mount anything in the bumper | + | ==== Inside the bumper ==== |
| + | |||
| + | |||
| + | In the case of the front bumper both on Jimny 3 and 4, it is not advisable to mount anything in the center bumper hole where there is a factory ventilation grille (except for very small lamps), because that might severely restrict the air flow towards the engine heat exchanger (improperly called "radiator"). | ||
| + | |||
| + | In the case of DDiS Jimny 3 with 63 kW K9K 266 diesel engine (2006-2010), it is also not advisable to mount anything in side ventilation grille holes in the front bumper, because that will restrict the air flow towards the intercooler which is positioned just behind the right side ventilation grille in the bumper. | ||
| + | |||
| + | In the case of a petrol Jimny 3 with 2nd gen. front bumper (2006-2012), installation of additional lamps in side ventilation grille holes in the front bumper should not incur significantly negative effects regarding proper engine cooling (apart from possibly looking ugly), it is a viable option. | ||
| + | |||
| + | |||
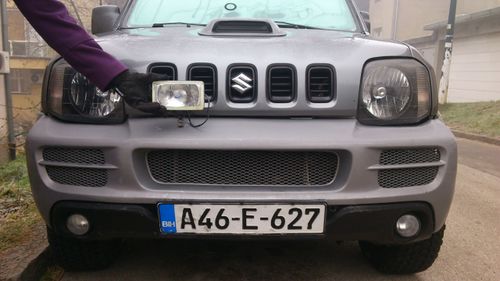
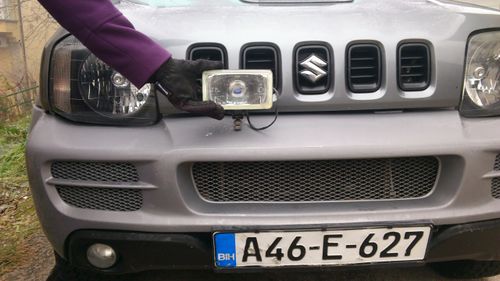
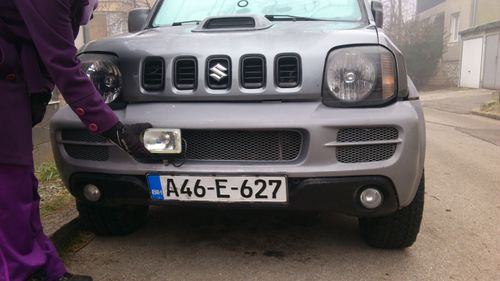
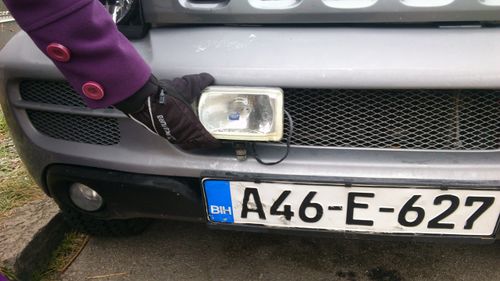
| + | <gallery widths="500px" heights="281px" class="center" perrow="2" caption="Driving lamp Hella Comet 450 position-tested in four potential positions on a Jimny 3 with 2nd model front bumper"> | ||
| + | File:Suzuki Jimny 3 - auxiliary driving lamp positioning test - A01.jpg | ||
| + | File:Suzuki Jimny 3 - auxiliary driving lamp positioning test - A02.jpg | ||
| + | File:Suzuki Jimny 3 - auxiliary driving lamp positioning test - B01.jpg | ||
| + | File:Suzuki Jimny 3 - auxiliary driving lamp positioning test - B02.jpg | ||
| + | File:Suzuki Jimny 3 - auxiliary driving lamp positioning test - C01.jpg | ||
| + | File:Suzuki Jimny 3 - auxiliary driving lamp positioning test - C02.jpg | ||
| + | File:Suzuki Jimny 3 - auxiliary driving lamp positioning test - D01.jpg | ||
| + | File:Suzuki Jimny 3 - auxiliary driving lamp positioning test - D02.jpg | ||
| + | </gallery> | ||
| + | |||
| + | ==== In front of the bumper ==== | ||
| − | |||
| − | |||
| + | Read the chapter on nudge bars further down below. | ||
| − | One simple solution (in theory) is to simply drill two holes on the top of the bumper (in front of the hood) and mount the driving lamps on the bumper itself. However, as the bumper is made of thin plastic, it vibrates and wobbles during driving, and so will the lamps that it would carry. Unless you fancy looking at the "dancing | + | |
| + | ==== On top of the bumper ==== | ||
| + | |||
| + | |||
| + | One simple solution (in theory) is to simply drill two holes on the top of the bumper (in front of the hood) and mount the driving lamps on the bumper itself. However, as the bumper is made of thin plastic, it vibrates and wobbles during driving, and so will the lamps that it would carry. Unless you fancy looking at the "dancing lights" in front of your vehicle while driving, you might quickly get sick of that annoyance in your field of vision. | ||
The vibration issue can be remedied by one of two methods: | The vibration issue can be remedied by one of two methods: | ||
# Reinforce the top of the bumper (from the inside) so that it becomes thicker / stronger / stiffer and does not vibrate and wobble. This is typically done by applying one or two layes of special plastic net soaked into thick epoxy resin (that's what vehicle bodywork restorers do when they fix damaged plastic vehicle panels). However, this solution might not entirely fix the vibration issue, depending on the weight of the driving lamps. | # Reinforce the top of the bumper (from the inside) so that it becomes thicker / stronger / stiffer and does not vibrate and wobble. This is typically done by applying one or two layes of special plastic net soaked into thick epoxy resin (that's what vehicle bodywork restorers do when they fix damaged plastic vehicle panels). However, this solution might not entirely fix the vibration issue, depending on the weight of the driving lamps. | ||
| − | # Fabricate and install / weld your own metal mounts behind the front bumper, which would hold onto the chassis. The mounts should end right below the top of the bumper. Then drill two holes in the top of the bumper just above the mounts. This will enable the driving lamps to be screwed into the mounts, and the bumper will have no weight bearing function whatsoever. This | + | # Fabricate and install / weld your own metal mounts behind the front bumper, which would hold onto the chassis. The mounts should end right below the top of the bumper. Then drill two holes in the top of the bumper just above the mounts. This will enable the driving lamps to be screwed into the mounts, and the bumper will have no weight bearing function whatsoever. This solution has been proven as a stable platform in practice, and completely eliminates the vibration / wobble issue. However, any future removal of the front bumper requires prior removal of the driving lamps. |
| + | # Buy ready-made or fabricate your own metal L-mounts which attach to the slam panel behind the bonnet grille and hover above the front bumper. Then attach the lamps to those mounts. | ||
| + | #* ''Someone should elaborate more on this solution from their practical experience.'' | ||
| + | #* Known ready-made aftermarket mounts in existence: | ||
| + | #*# [https://www.amazon.com/dp/B01ESPT7LA Chinese-made metal carriers]; | ||
| + | #*# [https://www.lrchallenge4x4.co.uk/product/suzuki-jimny-spots-light-mounting-brackets-mounts-bolt-on-no-drilling-led-bar/ LRChallenge's mounts]; | ||
| − | + | == Lamps mounted on nudge bars (bull bars) == | |
| − | |||
| + | {{Gen3|}}{{Gen4|}} | ||
| + | One pretty solution is to install a metal "nudge bar" ("bull bar") in front of the front bumper or in front of the rear bumper, and then mount the driving lamps on that bar. Nudge bars are excellent mounting points for driving lamps. In fact, that is their most useful role. Both the front and rear nudge bar could be used as a mount for the driving lamps. | ||
| − | + | However, nudge bars have several disadvantages. Two main disadvantages are that they are illegal in certain world regions and that most nudge bars significantly reduce vehicle's ground clearance (specifically: approach and departure angle respectively). | |
| + | Read the wiki article [[Bull bar (nudge bar)|'''"Bull bar (nudge bar)"''']] for more information. | ||
| − | |||
| − | + | == Wiring the additional driving lamps == | |
| + | |||
| + | {{Gen3|}}{{Gen4|}} | ||
| + | [http://www.bigjimny.com/index.php/forum/6-jimny-chat/64810-jimny-spotlights#207412 This forum topic] contains info and diagrams on how to wire additional driving lamps in a Jimny 3. | ||
{{Edited}} | {{Edited}} | ||
| − | [[Category:Electrical]] | + | |
| − | [[Category: | + | [[Category:Electrical - gen3]] |
| + | [[Category:Accessories - gen3]] | ||
| + | |||
| + | [[Category:Electrical - gen4]] | ||
| + | [[Category:Accessories - gen4]] | ||
Latest revision as of 06:46, 26 February 2020
![]() The content of any article might be expanded / improved in the future - revisit it sometimes.
The content of any article might be expanded / improved in the future - revisit it sometimes.
![]() Seen a mistake? Know something that isn't written? Edit and change this article yourself!
Seen a mistake? Know something that isn't written? Edit and change this article yourself!
![]() Some images in the article (if present) can be enlarged by clicking on them.
Some images in the article (if present) can be enlarged by clicking on them.
Contents
Introduction
Installing some additional driving lamps (either for forward or reverse driving) is on most people's wish list.
![]() Installing additional external lamps on a vehicle might be illegal in some regions of the world, or may require that the vehicle goes through some recertification process.
Installing additional external lamps on a vehicle might be illegal in some regions of the world, or may require that the vehicle goes through some recertification process.
Two possible mounting points for the driving lamps are either somewhere on the roof, or somewhere on/around front or rear bumpers.
Lamps mounted on the roof
Since most Jimnys 3 have factory longitudinal roof rails, the best way to mount the lamps on the roof is to attach any universal transverse roof rail(s) onto the longitudinal roof rails and then mount the lamps on transverse roof rail(s).
Since Jimnys 4 do not have longitudinal roof rails, they require the use of purpose-built transverse roof rails (their feet must be made especially for Jimny 4) and then mount the lamps onto those rails.
In any case, a DIY solution is required to install the wiring from the engine bay or from the passenger cabin all the way up to the roof, as neither Jimny generation has a factory preparation for any sort of wiring on the roof.
Advantages of roof mounted lamps:
- You can install many (up to ~10);
- They can be mounted either on the front end of the roof (for illumination when going forward) or on the rear end of the roof (for illumination when reversing).
- They do not restrict air flow to the engine;
- They do not pose a hazard to pedestrians in the case of collision, so they have more chances of being legal (but check with your local laws);
- No need to drill or glue anything to vehicle's body;
- They look prominent on the vehicle;
Disadvantages of roof mounted lamps:
- They increase air resistance during high speed driving;
- They may induce significant wind noise during high speed driving;
- They might get damaged if they tangle up in low branches when driving through a forest;
- The need to carry something else on the roof might be hindered by the presence of the lamps on the roof;
- They give off a prominent glare from the bonnet, reducing your forward vision
Lamps mounted on or near the bumpers
If you want to mount the driving lamps on/near the bumpers, you have a problem that both Jimny 3 and 4 have modern soft plastic bumpers. They are inadequate to be mounting holders for the lamps, because they are not sturdy enough.
Rear bumper
In case of the rear bumper on Jimny 3, (very small) driving lamps can be installed only in the bumper itself (by cutting a hole in it somewhere near the rear lamps). Mounting anything on the bumper is out of the question, unless you don't plan to open the rear door ever again.
Info needed in case of the rear bumper on Jimny 4 ...
Front bumper
Inside the bumper
In the case of the front bumper both on Jimny 3 and 4, it is not advisable to mount anything in the center bumper hole where there is a factory ventilation grille (except for very small lamps), because that might severely restrict the air flow towards the engine heat exchanger (improperly called "radiator").
In the case of DDiS Jimny 3 with 63 kW K9K 266 diesel engine (2006-2010), it is also not advisable to mount anything in side ventilation grille holes in the front bumper, because that will restrict the air flow towards the intercooler which is positioned just behind the right side ventilation grille in the bumper.
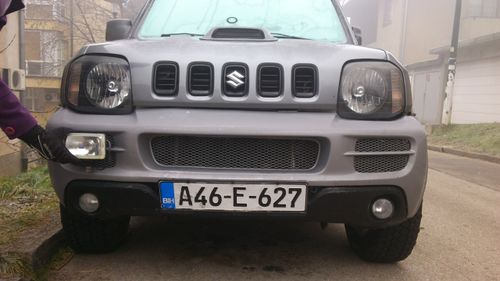
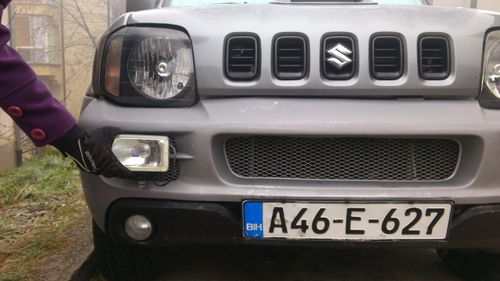
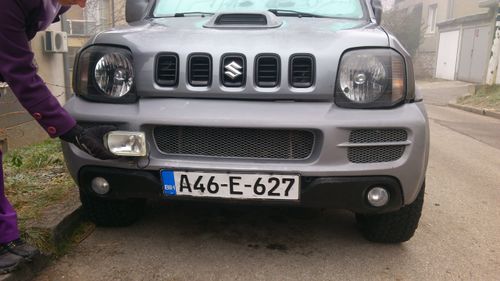
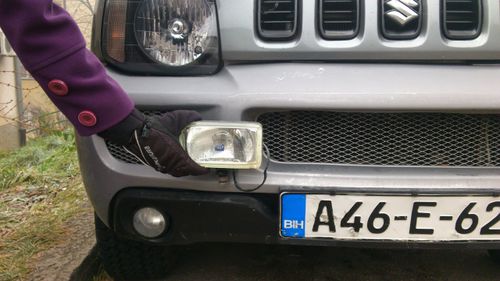
In the case of a petrol Jimny 3 with 2nd gen. front bumper (2006-2012), installation of additional lamps in side ventilation grille holes in the front bumper should not incur significantly negative effects regarding proper engine cooling (apart from possibly looking ugly), it is a viable option.
- Driving lamp Hella Comet 450 position-tested in four potential positions on a Jimny 3 with 2nd model front bumper
In front of the bumper
Read the chapter on nudge bars further down below.
On top of the bumper
One simple solution (in theory) is to simply drill two holes on the top of the bumper (in front of the hood) and mount the driving lamps on the bumper itself. However, as the bumper is made of thin plastic, it vibrates and wobbles during driving, and so will the lamps that it would carry. Unless you fancy looking at the "dancing lights" in front of your vehicle while driving, you might quickly get sick of that annoyance in your field of vision.
The vibration issue can be remedied by one of two methods:
- Reinforce the top of the bumper (from the inside) so that it becomes thicker / stronger / stiffer and does not vibrate and wobble. This is typically done by applying one or two layes of special plastic net soaked into thick epoxy resin (that's what vehicle bodywork restorers do when they fix damaged plastic vehicle panels). However, this solution might not entirely fix the vibration issue, depending on the weight of the driving lamps.
- Fabricate and install / weld your own metal mounts behind the front bumper, which would hold onto the chassis. The mounts should end right below the top of the bumper. Then drill two holes in the top of the bumper just above the mounts. This will enable the driving lamps to be screwed into the mounts, and the bumper will have no weight bearing function whatsoever. This solution has been proven as a stable platform in practice, and completely eliminates the vibration / wobble issue. However, any future removal of the front bumper requires prior removal of the driving lamps.
- Buy ready-made or fabricate your own metal L-mounts which attach to the slam panel behind the bonnet grille and hover above the front bumper. Then attach the lamps to those mounts.
- Someone should elaborate more on this solution from their practical experience.
- Known ready-made aftermarket mounts in existence:
Lamps mounted on nudge bars (bull bars)
One pretty solution is to install a metal "nudge bar" ("bull bar") in front of the front bumper or in front of the rear bumper, and then mount the driving lamps on that bar. Nudge bars are excellent mounting points for driving lamps. In fact, that is their most useful role. Both the front and rear nudge bar could be used as a mount for the driving lamps.
However, nudge bars have several disadvantages. Two main disadvantages are that they are illegal in certain world regions and that most nudge bars significantly reduce vehicle's ground clearance (specifically: approach and departure angle respectively).
Read the wiki article "Bull bar (nudge bar)" for more information.
Wiring the additional driving lamps
This forum topic contains info and diagrams on how to wire additional driving lamps in a Jimny 3.
Page last edited on 26/02/2020 by user Bosanek
