|
|
| Line 23: |
Line 23: |
| | }} | | }} |
| | <br clear=all> | | <br clear=all> |
| − | {{warning!I cannot emphasis too strongly how easy it is to break the old cover!}} | + | {{warning|I cannot emphasis too strongly how easy it is to break the old cover!}} |
| | <br clear=all> | | <br clear=all> |
| | | | |
| − | === Removing the Caliper and pads === | + | === Installation === |
| | [[File:Footwell.jpg|thumb|left|250px|Passenger footwell]] | | [[File:Footwell.jpg|thumb|left|250px|Passenger footwell]] |
| | Here is the filter cover, up underneath the dashboard on the passenger side of the vehicle | | Here is the filter cover, up underneath the dashboard on the passenger side of the vehicle |
| Line 37: |
Line 37: |
| | <br clear=all> | | <br clear=all> |
| | | | |
| − | [[File:Removing_pads.jpg|thumb|left|250x250px|Removing the brake pads]] | + | [[File:open_glovebox.jpg|thumb|left|250x250px|Cabin filter cover retaining clips]] |
| − | The pads are retained by small spring clips, a simple pull on the pads (horizontally away from the disk) should remove them (or gently prise out the pads with a small screwdriver - do not remove the spring clips). If you require new [https://www.bigjimny.com/store/front-brake-pads-aisin-suzuki-jimny.html pads], [https://www.bigjimny.com/store/front-pad-fitting-kit.html spring clips] or a [https://www.bigjimny.com/store/caliper-fitting-kit-aisin-suzuki-jimny.html caliper fitting kit] then these are available in the [https://www.bigjimny.com/store/ BigJimny Store].
| |
| | <br clear=all> | | <br clear=all> |
| − | | + | [[File:Retaining_clip.jpg|thumb|left|250x250px|Glovebox dropped open]] |
| − | === Removing the Brake Disc ===
| + | The filter cover is retained by smll clips on the end. The tip of the scewdriver points to where the clip is (hidden). |
| − | | |
| − | [[File:Carrier_bolt.jpg|thumb|250px|left|Carrier bolt]] | |
| − | The caliper is held on with two bolts at the rear (see below). | |
| | <br clear=all> | | <br clear=all> |
| | + | [[File:Removing_clip.jpg|thumb|250px|left|Using blade to prise clip]] |
| | + | Warm the plastic filter cover, either use a hairdrier or allow the cars own heater to warm the car (on re-circulate setting). If the plastic is cold it is more likely to fracture. |
| | + | Insert a small blade into the filter retaining lugs and gently prise it away from the edge of the moulded catches on the heater body. Do this a bit at a time alternating front and back. |
| | | | |
| − | [[File:Carrier_to_spring.jpg|thumb|250px|left|Caliper tied to Spring]]
| |
| − | Release the bolts and tie the caliper to the spring to keep it out of the way.
| |
| | <br clear=all> | | <br clear=all> |
| | | | |
| − | [[File:Disc_removal.jpg|thumb|250px|left|Disc removal using bolt]] | + | [[File:Inserting_filter.jpg|thumb|250px|left|Inserting the cabin filter]] |
| − | Now the front brake disc can be removed. If you are lucky it will simply pull off but if you have problems then there are two M8 holes in the disk hub. Simply run two bolts into these holes and the disk will push off the hub. The picture below shows a bolt being used to push the disk off the hub.
| + | If you have a UK Jimny, you are more than likely to find an empty hole now (full of bits of leaf). |
| − | <br clear=all>
| + | Simply insert the cabin filter. |
| | | | |
| − | My disk appeared to be ok on the visible side but the rear showed some bad wear so I will change them as part of this job. New [https://www.bigjimny.com/store/brake-disc-suzuki-jimny-107mm.html disks] are available in the [https://www.bigjimny.com/store/ BigJimny Store].
| |
| − | <gallery widths=250 heights=250>
| |
| − | Disc_front.jpg
| |
| − | Disk_rear.jpg
| |
| − | </gallery>
| |
| | <br clear=all> | | <br clear=all> |
| | | | |
| − | === Dismantling the Hub ===
| + | [[File:Attaching_cover.jpg|thumb|250px|left|Press the new cover on]] |
| − | | + | Gently press the filter cover back into place. |
| − | [[File:freewheelinghub.jpg|thumb|250px|left|Torx bolt on hub]] | |
| − | Now the Freewheeling Hub needs to be removed. Suzuki have used Torx bolts to secure these so you will require an E10 socket to remove the bolts.
| |
| − | <br clear=all>
| |
| − | [[File:hubcirclip.jpg|thumb|250px|left|Removing the circlip]]
| |
| − | With the hub removed the driveshaft is exposed. The driveshaft is retained with a circlip so use a pair of circlip pliers to remove it. This is really fiddly and can be an annoying task. Behind the circlip is a rectangular washer that should also be removed. Note that I have also marked with white paint the orientation of the freewheeling hub, this is not strictly needed.
| |
| − | <br clear=all>
| |
| − | [[File:vacuumpipe.jpg|thumb|250px|left|removing a vacuum pipe]]
| |
| − | Gently pull the two vacuum hoses for the hub from the knuckle making sure you note which one connects to each pipe. It is essential that you get this correct else the hub will not work again. Also note that if you have an ABS equipped vehicle then you will have to remove the sensor. I do not have photos of this but the video shows it. IT IS REALLY EASY TO SHEAR THE ABS BOLT - if you can I would soak it for a couple of days previously in penetrating oil. | |
| − | <br clear=all>
| |
| − | [[File:swivelsealbolts.jpg|thumb|250x250px|left|Removing the swivel seal bolts]]
| |
| − | At the rear of the hub release the small bolts holding the seal and retainer. You can see that the swivel hub is covered in oil, a bad sign for KingPin problems.
| |
| − | <br clear=all>
| |
| − | [[File:balljointsplitter.jpg|thumb|250px|left|Splitting the ball joint]]
| |
| − | Undo the nuts on the steering joints, if the joint rotates then put a jack under the joint and lift the car slightly to lock the joint. Using a splitter, split the steering joints (two to do on the passenger side and one on the drivers side – UK).
| |
| − | <br clear=all>
| |
| − | [[File:kingpinbolts.jpg|thumb|250px|left|undoing the Kingpin bolts]]
| |
| − | Finally, release the KingPin bolts themselves. There are two sets, top and bottom and they must not be mixed up so you can see in the picture that I have marked them up with a letter T. If you are doing both sides at once then do not mix them across either!.
| |
| − | <br clear=all>
| |
| − | The KingPins are also held in with sticky sealant so you will need to prise them out. The hub will now pull off. Beware, if they are badly worn the hub will be full of stinking grease, oil and water so make sure you can capture the mess in something. This is the bit I hate because of the smell!.
| |
| − | That’s water pouring out of the axle! Also shown is a worn out bearing.
| |
| − | <gallery widths=250px heights=250px>
| |
| − | leakingswivel1.jpg
| |
| − | leakingswivel2.jpg
| |
| − | wornbearing.jpg
| |
| − | </gallery>
| |
| − | <br clear=all>
| |
| − | The bearings are Koyo brand as standard. The BigJimny store has two kits available, the [https://www.bigjimny.com/store/kingpin-bearing-kit-suzuki-jimny-koyo.html basic kit] has the two bearings and the small oil seal required to do one side. The [https://www.bigjimny.com/store/kingpin-bearing/seal-kit-suzuki-jimny.html full kit] also included the large external seal although some people choose not to change this. The thing to remember is that it is not a Landrover which has oil filled swivels. The joints on Jimnys should be "dry" apart from some lubricating grease.
| |
| − | | |
| − | The next stage is to CLEAN, CLEAN and then CLEAN again. Clean the swivels inside and out, clean the knuckles and pull out the drive shaft and clean that as well.
| |
| − | | |
| − | === The rebuild ===
| |
| − | | |
| − | [[File:outerrace.jpg|thumb|250px|left|The old bearing race]]
| |
| − | Once clean you can start the rebuild process. The KingPin bearings come in two parts, the race and an outer ring. This ring is still in the swivel and needs driving out.
| |
| − | <br clear=all>
| |
| − | [[File:Remove Bearing Race.jpg|thumb|250px|left|Removing the bearing race]]
| |
| − | A simple way to drive them out is to use a 1" Imperial socket. Using an extension bar fed through the swivel place the 1" Socket behind the ring and drive it out by hitting it. (picture from Dave at [http://www.bits4vits.co.uk Bits4Vits]
| |
| | <br clear=all> | | <br clear=all> |
| | | | |
| − | The new rings can then be driven into place with a piece of wood to protect them from the hammer, again this is seen in the video {{color|green|(''picture needed here'')}}.
| + | [[File:Broken_cover.jpg|thumb|250px|left|Broken!!]] |
| − | | + | P.S DON’T THINK YOU WILL BE IMMUNE TO BREAKING THE FILTER COVER – HERE IS MINE! |
| − | I also hooked out the small axle shaft oil seal and put a new one in from the BigJimny kit. {{color|green|(''picture needed here'')}}.
| |
| | <br clear=all> | | <br clear=all> |
| − | [[File:rebuiltswivel.jpg|thumb|250px|left|The rebuilt swivel]]
| |
| − | Here is the completed swivel with new rings and oil seal (and plenty of copper grease to help them all into place.
| |
| − | <br clear=all>
| |
| − | If you are changing the large seal then now is the time to put the new one on. The confusing part is the order of the seals and rings on the swivel, the picture below is of the correct orientation, note also that the slits in the retainers go to the top.
| |
| − | <gallery widths=250 heights=250>
| |
| − | seal1.jpg
| |
| − | seal2.jpg
| |
| − | </gallery>
| |
| − | <br clear=all>
| |
| − | [[File:cvjoint.jpg|thumb|250px|left|The greased CV joint]]
| |
| − | Pack the CV with grease (but do not overpack) and re-fit the driveshaft. A suitable [https://www.bigjimny.com/store/waterproof-grease.html waterproof grease] is available in the BigJimny Shop.
| |
| − | <br clear=all>
| |
| − | [[File:sealant.jpg|thumb|250px|left|Applying sealant]]
| |
| − | Grease the new KingPin bearings and insert the top one in the carrier. I find the easiest way to grease the bearings is to put them in a polythene bag with some grease and use thebag to squeeze the grease into the bearing, this can be seen in the video. (''picture needed here'') .Carefully insert the new bottom bearing and, holding it in place, slide the whole knuckle onto the hub. Fill the Knuckle with 100ml of grease, Suzuki recommend only 100ml and not to overfill. Now the KingPins need to be inserted, but first they need a bead of sealant around the KingPin. Again the BigJimny shop sells suitable [https://www.bigjimny.com/store/loctite-premium-copper/silicone-sealant.html sealant].
| |
| − | <br clear=all>
| |
| − | Make sure that you have put the correct Kingpin in place, remember you should have marked them when you dismantled it!
| |
| | | | |
| − | Bolt the Kingpins in and tighten them to the correct torque (18ft/lbs)
| |
| − |
| |
| − | Refit the steering arm (or arms if it is the side with two connections), tightening the nuts to 31ft/lbs
| |
| − |
| |
| − |
| |
| − | Fit the disk and fit the caliper (Caliper bolts 61ft/lbs), brake pads and bolt the caliper down in position (Caliper pin bolt 16/ft/lbs)
| |
| − |
| |
| − | Re-fit the wheel and lower the vehicle.
| |
| − |
| |
| − | === Torque Settings ===
| |
| − | Full details of the torque settings can be found in the [[Torque#Front_Hub | reference data]]
| |
| − | <br clear=all>
| |
| | | | |
| | {{Edited}} | | {{Edited}} |
| | [[Category:Howto]] | | [[Category:Howto]] |
Fitting a Cabin/Pollen Filter
Introduction
I wouldn’t mind betting that most people do not realise that the Jimny has a pollen filter or at least has the facility for a pollen filter. Most manuals never refer to it, even in the Service Guide.
I would also bet that most people, particularly those who drive off-road, are tired of the clouds of leaves that hit you in the face when you open the facia vents.
Fitting a pollen filter is straight forward once you know where it is hidden.
First you need a pollen filter [See the BigJimny Shop Filter
Also note that it is common to break the filter cover when removing it as the plastic becomes brittle, you may wish to consider buying a spare cover at the same time (See the BigJimny Shop Cover
Changing/Installing a Filter
Tools

- Assorted screwdrivers or blade
 I cannot emphasis too strongly how easy it is to break the old cover!
Installation
Here is the filter cover, up underneath the dashboard on the passenger side of the vehicle

Here is the cover in the footwell
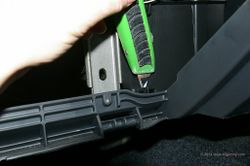
First remove the glovebox, this is done by flexing the sidewalls so the plastic retaining lugs can drop past the edge of the fascia. Lower the whole glovebox away. I am using a screwdriver with the end protected by a cloth to stop it marking the fascia as I use it to prise away the retaining lugs.

Cabin filter cover retaining clips
The filter cover is retained by smll clips on the end. The tip of the scewdriver points to where the clip is (hidden).
Using blade to prise clip
Warm the plastic filter cover, either use a hairdrier or allow the cars own heater to warm the car (on re-circulate setting). If the plastic is cold it is more likely to fracture.
Insert a small blade into the filter retaining lugs and gently prise it away from the edge of the moulded catches on the heater body. Do this a bit at a time alternating front and back.

Inserting the cabin filter
If you have a UK Jimny, you are more than likely to find an empty hole now (full of bits of leaf).
Simply insert the cabin filter.
Gently press the filter cover back into place.
P.S DON’T THINK YOU WILL BE IMMUNE TO BREAKING THE FILTER COVER – HERE IS MINE!
Page last edited on 17/05/2016 by user Mlines


